Email Workflow in Mapp Engage
Now that your Engage system is set up, you can start connecting with your audiences. This guide shows you how to organize your data and workflows for a successful email marketing campaign. We'll give you a comprehensive overview of all the stuff you need to get ready to kick off your first email sendout campaign. We'll list the tools and features within Mapp Engage that you should use to achieve your goals.
Basic workflow for a personalized Email sendout
Check out our introductory video to get an idea about the basic workflow. It takes less than 3 minutes!
Prerequisites
Your Engage system is all set up and live. Users and permissions are configured, content blocks are created, and you are ready to go.
Procedure
A) Audience
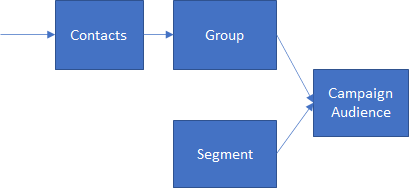
CREATE A GROUP
A group is a list of addresses to which you send messages. Groups allow you to organize your contacts in Mapp Engage. You can create as many groups as you want. A common and recommended use of Groups is per channel: Email, SMS, Mobile Push, Direct Mail, etc. But you can create other groups depending on the size of your contact list, sendout frequency, and other factors relevant to your business. You must create groups before you import contacts into Mapp Engage.
Documentation Description Create New Group This article describes the basic procedure to create a group and a high-level description of available group settings. Define Group Settings In this section, you will find articles about all the setup possibilities for groups. This is a fairly broad topic, as group settings include such important aspects as:
- reply handling.
- deactivation settings.
- tracking and links.
- sendout options and more.
Manage Group Attributes A group attribute stores one value for all members of a group. The value is identical for all group members.
Group attributes are an ideal place to store data that changes frequently, and which is not recipient-specific. You can create group attributes manually, or import them via CSV or XML imports.
IMPORT CONTACTS
Before you start building your audiences, you need to get their contact data into Mapp Engage. Contact data are imported into groups.
Below are the different ways of importing contacts into Mapp Engage.Documentation Description Manual import This article describes how to import contacts and profile attribute data into a group. The import file can be in CSV, XML, or text format. Automated import You can create automations that will perform contact imports at regular intervals. For more information, see Create a New Time-Based Automation.
Import with Mapp Connect With Mapp Connect, you can set up complex automated imports that let you sync your contact data from external sources into your Mapp Engage system. This is a very robust solution and offers faster imports. Mapp Connect requires some additional setup. Check out the documentations, and contact your account manager if you need more information. BUILD YOUR AUDIENCES
Defining your target audiences is key to success in digital marketing. Mapp's Segmentation Builder is a tool that picks exactly those contacts from within your groups that you want to target with a specific message or campaign. Those contacts are put into segments which can be used across the platform.Documentation Description Segmentation Builder Basics Read this article if you are not yet familiar with Segmentation Builder. It clarifies the basic concept behind segmenting your contacts and explains the user interface of the tool. Here, you will also find a description of the available segmentation criteria:
How-Tos for Segmentation Builder Here, you will find basic procedures, for example:
Use Cases for Segmentation Builder This sections shows you practical examples of segments with detailed configuration. The use cases are available in 5 different categories:
B) Message
CREATE AN EMAIL MESSAGE
There are two ways to create messages in Mapp Engage: with pre-designed templates (recommended) or manually.Documentation Description Message Basics Read this article if you are not yet familiar with email messaging in Engage. Create emails using pre-designed templates:
You can create templates and other reusable email elements in advance. This way you can ensure that all your emails have the same look and feel.
Creating these elements requires HTML knowledge. Reach out to you account manager if you are interested in support options.The four basic elements are:
- frameworks
- blocks
- email templates
- email messages
For more information, see Concept and Definitions.
Create emails manually You create emails in the message creation area, using either HTML code, or a HTML editor if you have no HTML know-how. You can paste, upload, or create message content here. ADD PERSONALIZATION AND VARIABLES
Personalization and variables is part of the message creation process.Documentation Description Add Personalization Adds content that is selected specifically for the recipient or target group to the message. Personalization makes the content of your messages more relevant. For example, you can start an email addressing the contact with their first name. Add Variables Insert content automatically into a message that is the same for all recipients of the message. For example, you can add a coupons or barcodes to a message, or links to read the message in a web browser, read a mobile version, unsubscribe, or change profile data. PREVIEW AND TEST THE MESSAGE
Before you send your message, it´s good practice to do some quality assurance.Documentation Description Message Preview Review personalized draft emails before sendout. Inbox Rendering Verify that the design and content of your message are optimal. Inbox Monitoring Test the deliverability of your message across platforms and internet service providers. Split Sendout Try out various email variants to identify the highest-performing one.
C) Sendout
Before sending out the message, Mapp Engage processes it according to all the parameters defined by you in previous steps. The relevant recipients are selected, and individual emails are created for sendouts that include personalization.
Documentation | Description |
|---|---|
Plan your sendout:
Remember that you already defined group-specific sendout settings during group creation (see Sendout Options). | |
Whiteboards allow you to build simple and complex sendout scenarios for your messages and campaigns. You can create entire customer journeys that are triggered at a specified time, or in reaction to your contact activity. For example, you can send birthday emails to your existing contacts, or welcome emails to newly subscribed contacts. Scenarios are endless, so we encourage you to familiarize yourself with this tool. |
D) Performance & Reporting
For any email campaign it is important to monitor your KPIs.
Documentation | Description |
|---|---|
See all your metrics and KPIs in one place, including interactive graphs and reports. | |
| How Mapp Engage Measures Email Marketing Success | Mapp Engage has both native performance monitoring solutions, and those available through integrations with web analytics tools.
The web analytics tool we recommend is Mapp Intelligence, which is part of Mapp Cloud.
|
Export reports and raw data: | Download and view customizable reports. Analyze the data that matters to you. |
Export large amounts of detailed data for analysis in an external tool. Create freely definable custom exports that fit your needs and system requirements. |
Interested in training?
Check out Academy, Mapp´s e-learning platform with courses covering the most important products and features of Mapp Cloud. You can use it at any time free of charge.