Welcome Program (Subscribers)
Scenario
Send a welcome message to all new group subscribers. The program includes a follow-up message to all new subscribers who don't click the welcome message.

Benefits
Automatically respond to every new subscription to your newsletter.
Get your customer relationship off to a great start with an enthusiastic, genuine welcome mail and a targeted follow-up.
Encourage new subscribers to become purchasing customers.
Marketing Inspiration
Consider creating a separate campaign for contacts who subscribe and at the same time complete their first purchase. Purchasers already receive a confirmation email and a shipping confirmation, so you don't want to bombard them with emails in the first week. Instead, consider sending them a customized welcome program that starts a week after the initial purchase. Use this welcome program to cross-sell related products and strengthen the customer relationship.
Don't forget to set up a profile enrichment program so that you're continuously gathering data about your contacts. See Profile Enrichment.
Procedure
This procedure has three steps.
A) Create two messages: a welcome message and a follow-up message.
B) Create a selection that identifies contacts who were added to the group a week ago, but who didn't click on the welcome message.
C) Create an event-based automation that sends the welcome message after subscription. On the same whiteboard, create a time-based automation that sends the reminder message on a daily basis. The reminder is sent to contacts who were added to the group a week ago, but who didn't click on the welcome message.
A) Create the Messages
| WelcomeMessage | Save the message as a prepared message. For more information, see Save Draft as Prepared Message. |
| ReminderMessage |

Hint:
You can update the content of the prepared message at any time. For example, you can easily add or change a coupon or update the graphics. There is no need to change or pause the automation. Sendout with the new content continues as scheduled.
B) Create Selection
Create a selection that identifies contacts who were added to the group a week ago, but who didn't click on the welcome message.
In the Recipients > Selection area, create a new selection with the following two conditions. Combine the conditions with and.
 | Condition 1: Selects contact who did not click on the special introductory offer email. Basis for Condition: Message Group: Select the group. Message: Prepared Message. From the Prepared Message drop-down list, select the WelcomeMessage message. Click Add Status: Link clicked, No, Any link |
Condition 2: Selects contacts who were added to the group Basis for Condition: Group Select the group into which you import new contacts. Attribute: Member Creation Date Click Add Match: Selection run date, exactly before, 7 days |
C) Create Automations
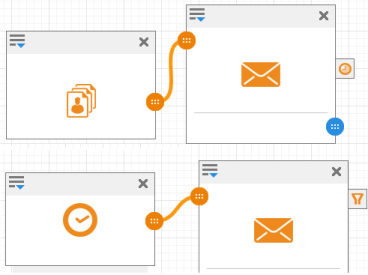
- In the Automation area, create a new whiteboard.
- Drag one Time module, one Time-based job module, one Event module, and one Event-based job module onto the whiteboard.
- Drag and drop between the connection
 buttons to connect the modules as shown above.
 Define the module settings as follows:
a. Event Module
Field
Entry
This module tracks new subscriptions to the group.
Name
Enter a name for the module.
Event
Subscription to Group (C)
Group Name
Select the group.
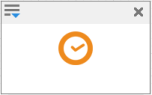
b. Event-based Job Module
Field
Entry

This module sends a welcome message to new subscribers.
Name
Enter a name for the module.
Job
Send Prepared Message to Contact (C)
Contact
Select the Use Event Parameter check box. This check box tells Mapp Engage to send the welcome message to the same contact who just subscribed to the newsletter.
Message
Select the WelcomeMessage.
Define Delay
Use the fields in the Define Delay area to define an optional delay between subscription and sendout of the welcome message.
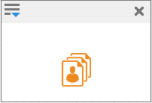
c. Time Module
Field
Entry
This module is a daily schedule.
Name
Enter a name for the module.
Date
Recurring Date
Time
Define the desired time of the daily sendout.
Period
Day(s)
Value
1
d. Time-based Job Module
Field
Entry
This module sends a message to the reminder selection.
Name
Enter a name for the module.
Job
Send Prepared Message to Selection
Message
Select the ReminderMessage.
Selection
Select the reminder selection.
- Click Next.
⇒ The Whiteboard wizard opens to step two. - Define the desired time frame and notifications.
- Click Activate to immediately activate the whiteboard. Only active whiteboards are executed by the system.