Step 2: Configuring and Activating the Plugin
In this section, you will find the steps to integrate the plugin based on the used pixel integration.
Implementation Methods
The element to be tracked is divided into 200 parts, each part with an individual timer that determines at what point the specific element is marked as read.
The following list shows all recordable parameters and their predefined IDs:
- Event parameter 921: Content Engagement - Name
- Event parameter 922: Content Engagement - Element Visibility % (figure)
- Event parameter 923: Content Engagement - Element Visibility % (text)
The plugin does not work when using infinite scrolling.
If a "READ MORE" button or similar is used in an article, you can create a second element for the plugin after a user clicked on the button. The plugin will then track the content inside the second element separately (it will create two separate analyses for the article).
Browser support
The content engagement plugin uses "querySelector" to find the configured elements. This method is supported by the following browsers:
- Internet Explorer version 8 or higher
- Microsoft Edge
- Firefox version 3.5 or higher
- Google Chrome
- Safari version 3 or higher
- Opera version 10 or higher
Methods and properties
name
Get the name of the extension.
/**
 * @type {string}
 */
wtSmart.extension.content_engagement.name;version
Get the version of the extension.
/**
 * @type {string}
 */
wtSmart.extension.content_engagement.version;config
Set and get the current configuration of the extension.
- percentageStepsInAnalytics: Define the percentage steps that are to be reported in Analytics (e.g., "five" means that the count is incremented in five steps).
- sendContentEngagement: Specify the event that triggers the sending of content engagement to Analytics:
- 0: on leaving the page: The user clicks a link or reloads the page.
- 1: after reaching % of content: The user exceeds a certain percentage (e.g., all 25% of the element).
- 2: after reaching x sec if status changed: After a certain number of seconds (e.g., every 30 seconds).
- percentageReached: If you specify "1" as the event trigger, enter the desired percentage here (e.g., at 25%, the event is triggered after every 25%).
- secondsReached: If you specify "2" as the event trigger, define the desired interval of seconds here (e.g., at 30 the event is triggered every 30 seconds if the percentage has increased).
- largeBrowserResolution: Specify the browser resolution for large screens in pixels (greater than or equal to the specified number of pixels).
- largeBrowserSeconds: Specify the seconds to mark part of the element as read on large browser resolutions (the element is divided into 200 sections).
- mediumBrowserResolution: Specify the browser resolution for medium-sized screens in pixels (greater than or equal to the specified number of pixels).
- mediumBrowserSeconds: Specify the seconds to mark part of the element as read on medium browser resolutions (the element is divided into 200 sections).
- smallBrowserResolution: Specify the browser resolution for small screens in pixels (greater than or equal to the specified number of pixels).
- smallBrowserSeconds: Specify the seconds to mark part of the element as read on small browser resolutions (the element is divided into 200 sections).
/**
 * @param {{
 *      [percentageStepsInAnalytics=5]: number,
 *      [sendContentEngagement=0]: number,
 *      [percentageReached=25]: number,
 *      [secondsReached=30]: number,
 *      [largeBrowserResolution=1080]: number,
 *      [largeBrowserSeconds=20]: number,
 *      [mediumBrowserResolution=700]: number,
 *      [mediumBrowserSeconds=10]: number,
 *      [smallBrowserResolution=400]: number,
 *      [smallBrowserSeconds=5]: number
 * }} [config]
 *
 * @returns {object}
 */
wtSmart.extension.content_engagement.config(config);isActivated
Get the status, if the extension is enabled.
/**
 * @returns {boolean}
 */
wtSmart.extension.content_engagement.isActivated();activate
Activate the extension.
wtSmart.extension.content_engagement.activate();deactivate
Deactivate the extension.
wtSmart.extension.content_engagement.deactivate()Example
// is content engagement activated
var isActivated = wtSmart.extension.content_engagement.isActivated();

// set content engagement config
wtSmart.extension.content_engagement.config({
    percentageStepsInAnalytics: 5,
    sendContentEngagement: 0,
    percentageReached: 25,
    secondsReached: 30,
    largeBrowserResolution: 1080,
    largeBrowserSeconds: 20,
    mediumBrowserResolution: 700,
    mediumBrowserSeconds: 10,
    smallBrowserResolution: 400,
    smallBrowserSeconds: 5
});

// activate content engagement
wtSmart.extension.content_engagement.activate();

// deactivate content engagement
wtSmart.extension.content_engagement.deactivate();Debug mode
If you want to check the current plugin configuration, you can activate the plugin debug mode. For this, add the URL parameter or hash fragment "wtstp_debug" into the URL. Please note you will need to reload the page after activating this.
http://new.domain.com/start.html?wtstp_debug=1

or

http://new.domain.com/start.html#wtstp_debug=1Initialization of the elements
To flag the element you want to measure, add the configuration to the "wtstp_ce" array. The configuration for an element is divided into "selector", "name" and "config".
- selector: enter the element to be measured. You can either pass this directly as an HTML element or pass the respective CSS selector for the element.
- shadowRoot: If your content to be measured is inside a shadow DOM element, specify the CSS selector of the shadow DOM element. If you have defined a CSS selector as the "selector", it will refer to the "shadowRoot" selector you have defined.
- name: enter a name of the element to be measured. Alternative, the plugin used the name from the current page (contentId).
- config: you can overwrite the current plugin configuration.
window.wtstp_ce = window.wtstp_ce || [];
window.wtstp_ce.push(
    {
        selector: "#article",
        name: "name of the element",
        config: {
            percentageStepsInAnalytics: 5,
            sendContentEngagement: 0,
            percentageReached: 25,
            secondsReached: 30,
            largeBrowserResolution: 1080,
            largeBrowserSeconds: 20,
            mediumBrowserResolution: 700,
            mediumBrowserSeconds: 10,
            smallBrowserResolution: 400,
            smallBrowserSeconds: 5
        }
    }
);Event simulation
If you change the size or position of the flagged element, you should notify the plugin via "scroll" or "resize". If you use the plugin on a SPA, you should simulate "unload" before changing the page.
- scroll: The current position of the visible area within the website is determined. Then the visible areas are marked by the configured "Timer".
- resize: The size and position of the flagged element will be recalculated. Then the "scroll" event is simulated.
- unload: The registered events "scroll", "resize" and "unload" are removed. After this, any pending tracking information will be sent (configuration dependent).
window.wtstp_ce = window.wtstp_ce || [];
window.wtstp_ce.push('scroll');

window.wtstp_ce = window.wtstp_ce || [];
window.wtstp_ce.push('resize');

window.wtstp_ce = window.wtstp_ce || [];
window.wtstp_ce.push('unload');Integrate the Content Engagement Plugin into the container in which the webpage to be measured is located.
To add plugins to the desired container, proceed as follows:
- In the container overview, select the required container by clicking the corresponding entry.
- Click Add Plugin. You will be forwarded to the overview of all available plugins.
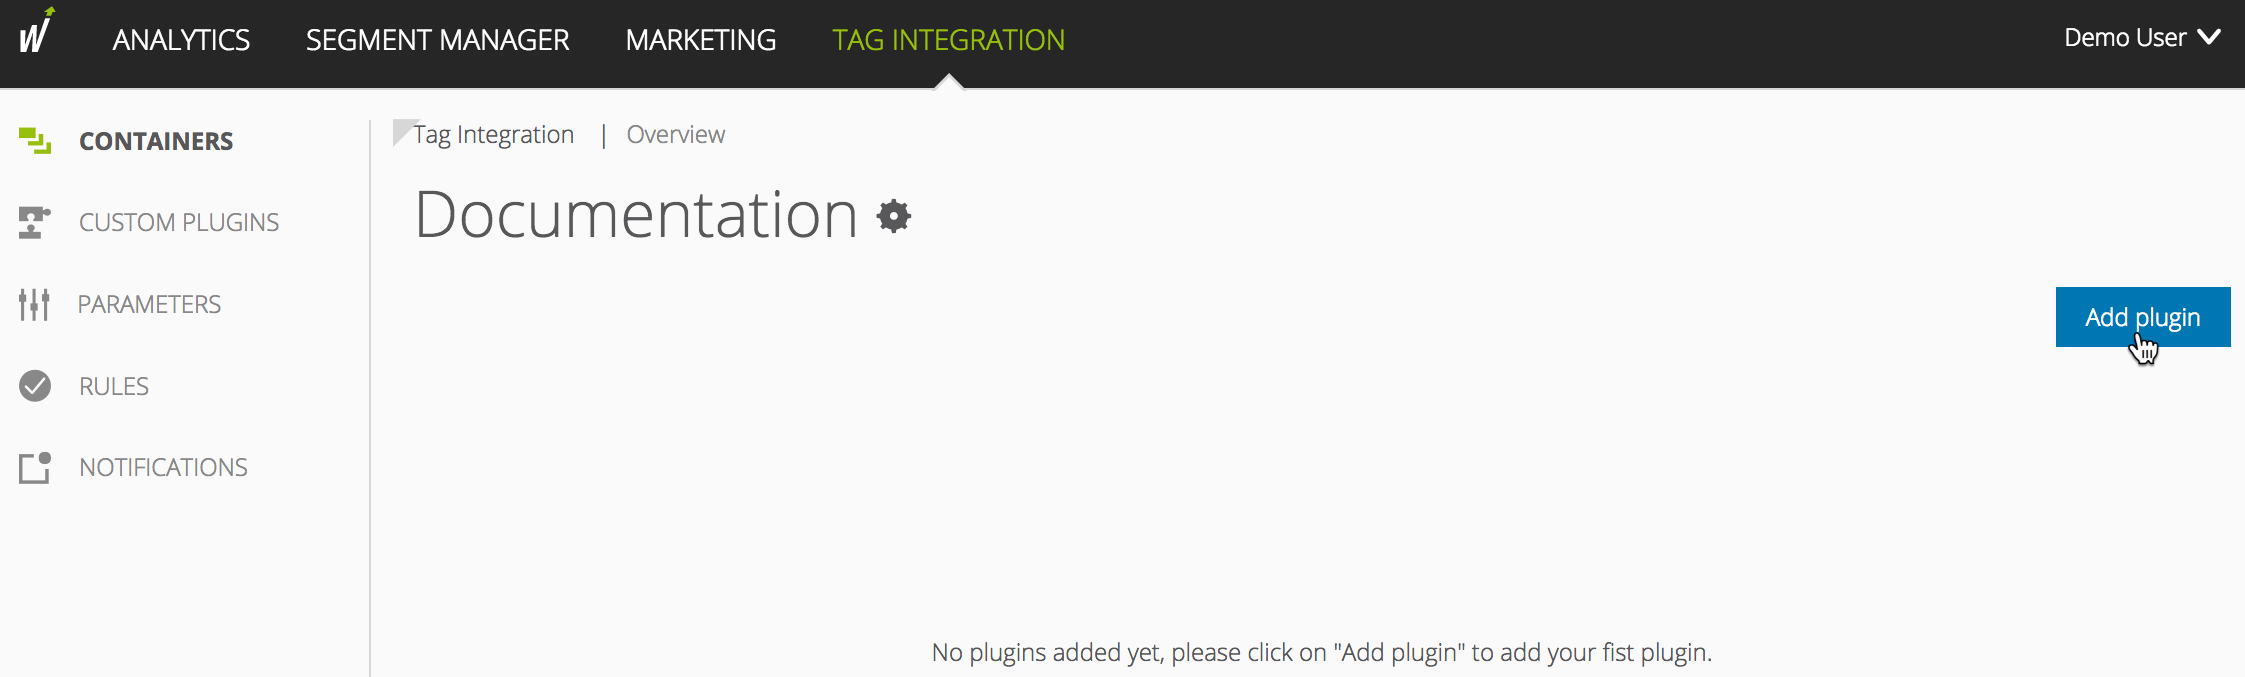
Select Content Engagement Plugin by clicking the appropriate button. The plugin configuration dialog opens.
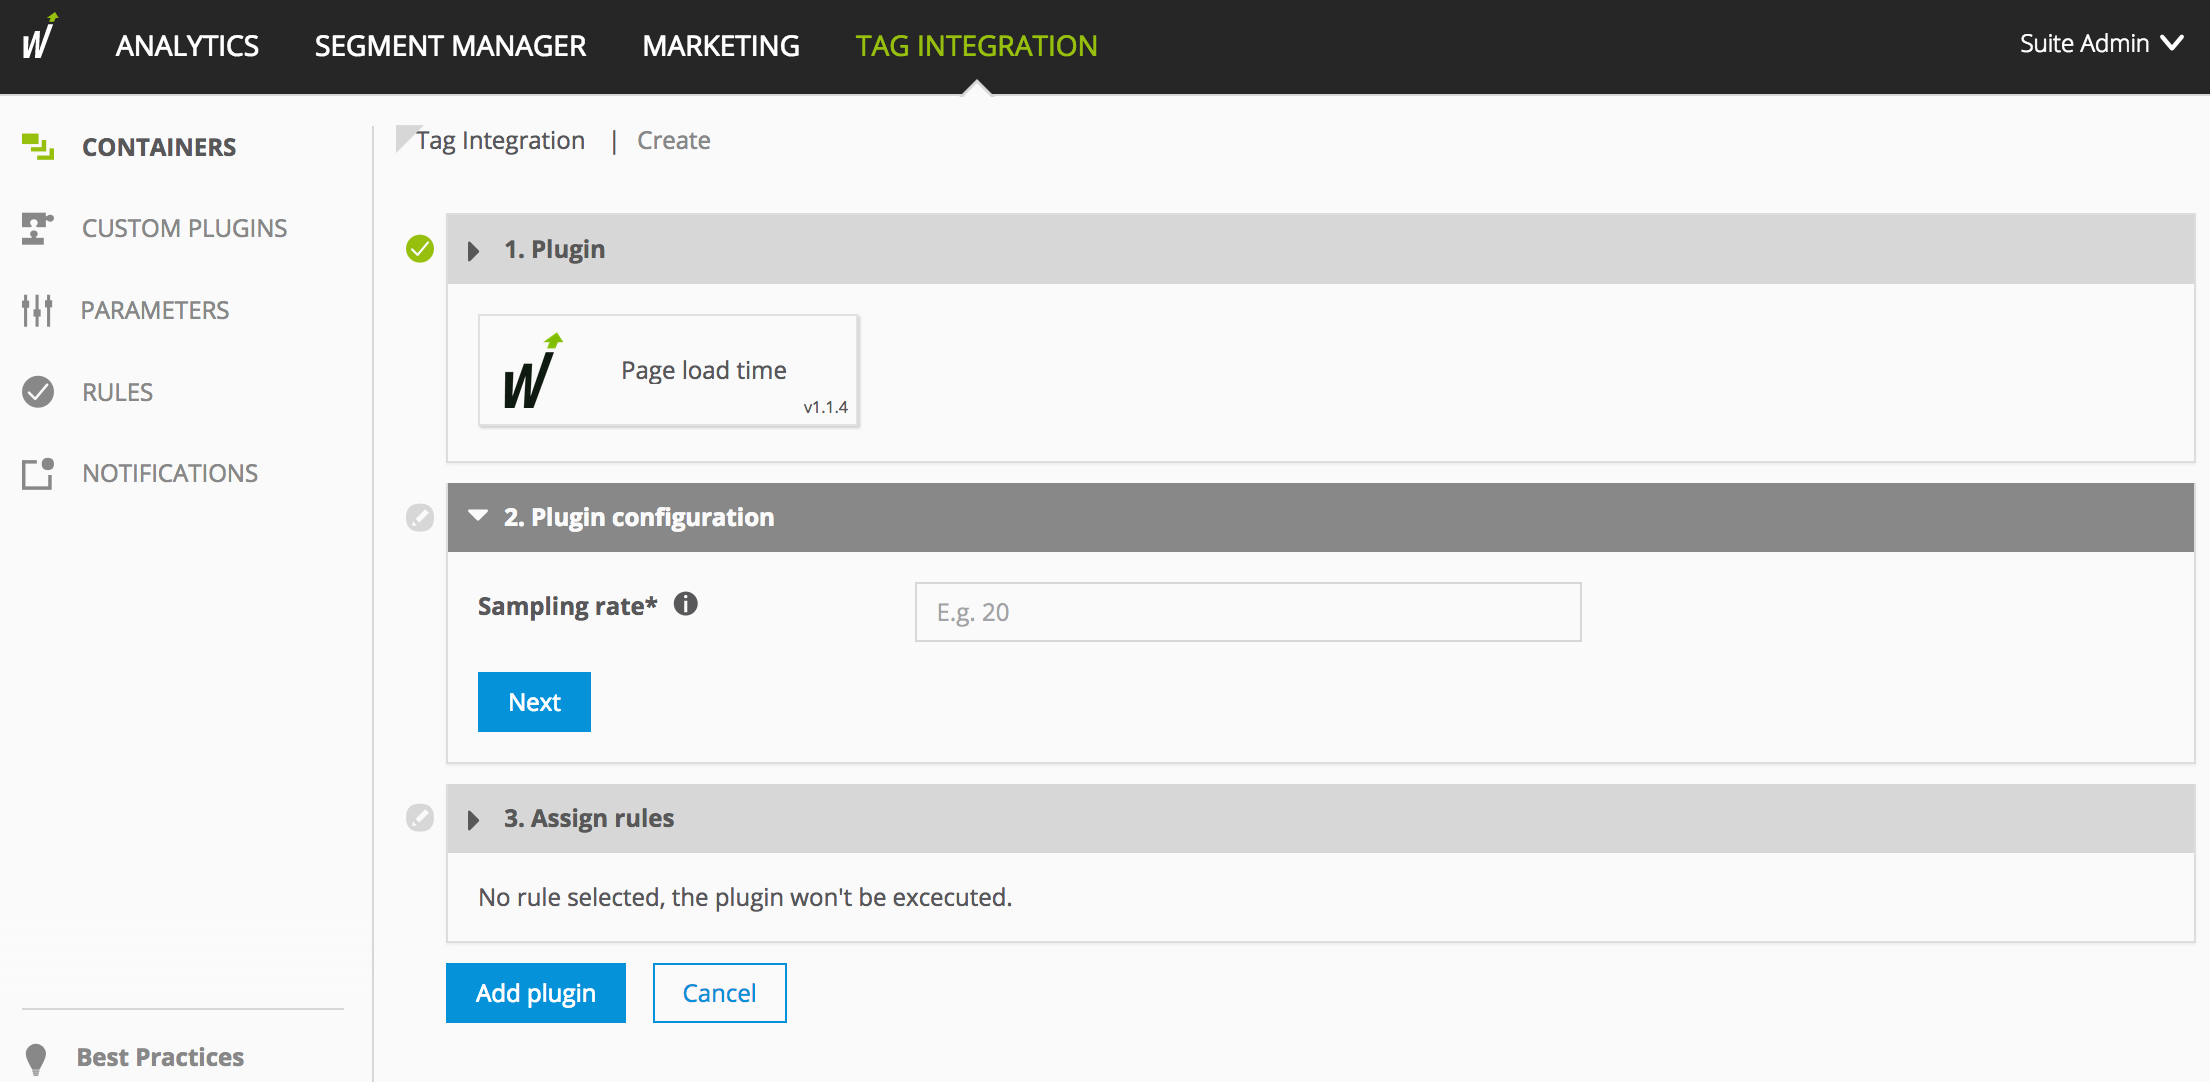
First, make the Request configuration:
Two different settings can be defined:
- In which steps regarding the percentage should the engagement be analyzed?
The predefined setting is 5 percent. - When should the information on engagement be sent?
3 options are available:- on leaving the page (preconfigured)
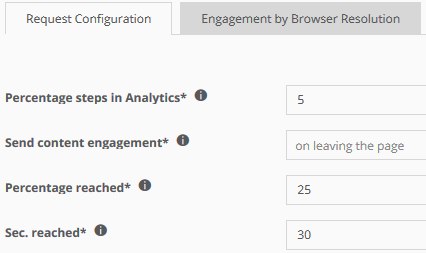
Please note that the engagement information is possibly not passed if the user closes his browser. - after reaching % of content
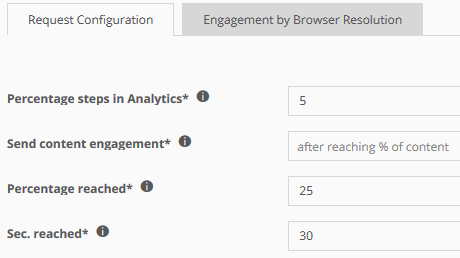
The information is sent as soon as the defined engagement value is reached ("Percentage reached") Steps of 25% are predefined, i.e., if an article has been viewed completely, the information is passed 5 times (0%, 25%, 50%, 75%, and 100%).
Advantages of this method:- It is less likely that values are missing because a user closed his browser, as data is passed gradually. The smaller the chosen value, the higher the accuracy.
- Allows a funnel-like analysis: After which share (stepwise) do users stop viewing?
- after reaching x seconds if % steps changed
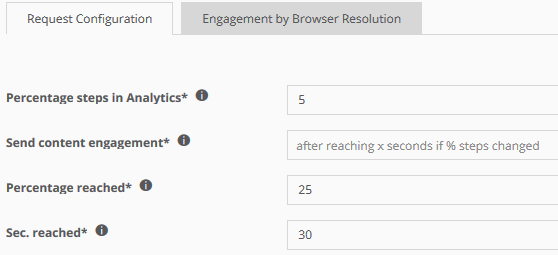
The information is sent as soon as the defined time is reached. Also, it is sent after closing the browser if engagement increases. 30 seconds are predefined.
If an article has been viewed for 90 seconds and the engagement at 30 seconds is 10%, at 60 seconds is 10% and at 90 seconds is 20%, the information is passed two times (after seconds 30 and 90).
Advantages of this method:- It is less likely that values are missing because a user closed his browser, as data is passed gradually. The lower the chosen time, the higher the accuracy.
- It is less likely that values are missing because a user closed his browser, as data is passed gradually. The lower the chosen time, the higher the accuracy.
- on leaving the page (preconfigured)
- In which steps regarding the percentage should the engagement be analyzed?
Next, configure the Engagement by browser resolution tab.
For calculating the engagement, the content is split into equal-sized parts. Each part has to be shown for a certain amount of seconds in the browser to count as engagement. Many websites dynamically adapt to the size of the browser window. High resolutions usually show more text than low resolutions. Consequently, the user needs more time to read the content for high resolutions.Here, the time in seconds that is necessary to count as "engagement" can be defined for three groups of browser resolution (small, medium, large).
Hint: In the debug mode, you can check the settings directly on your website.
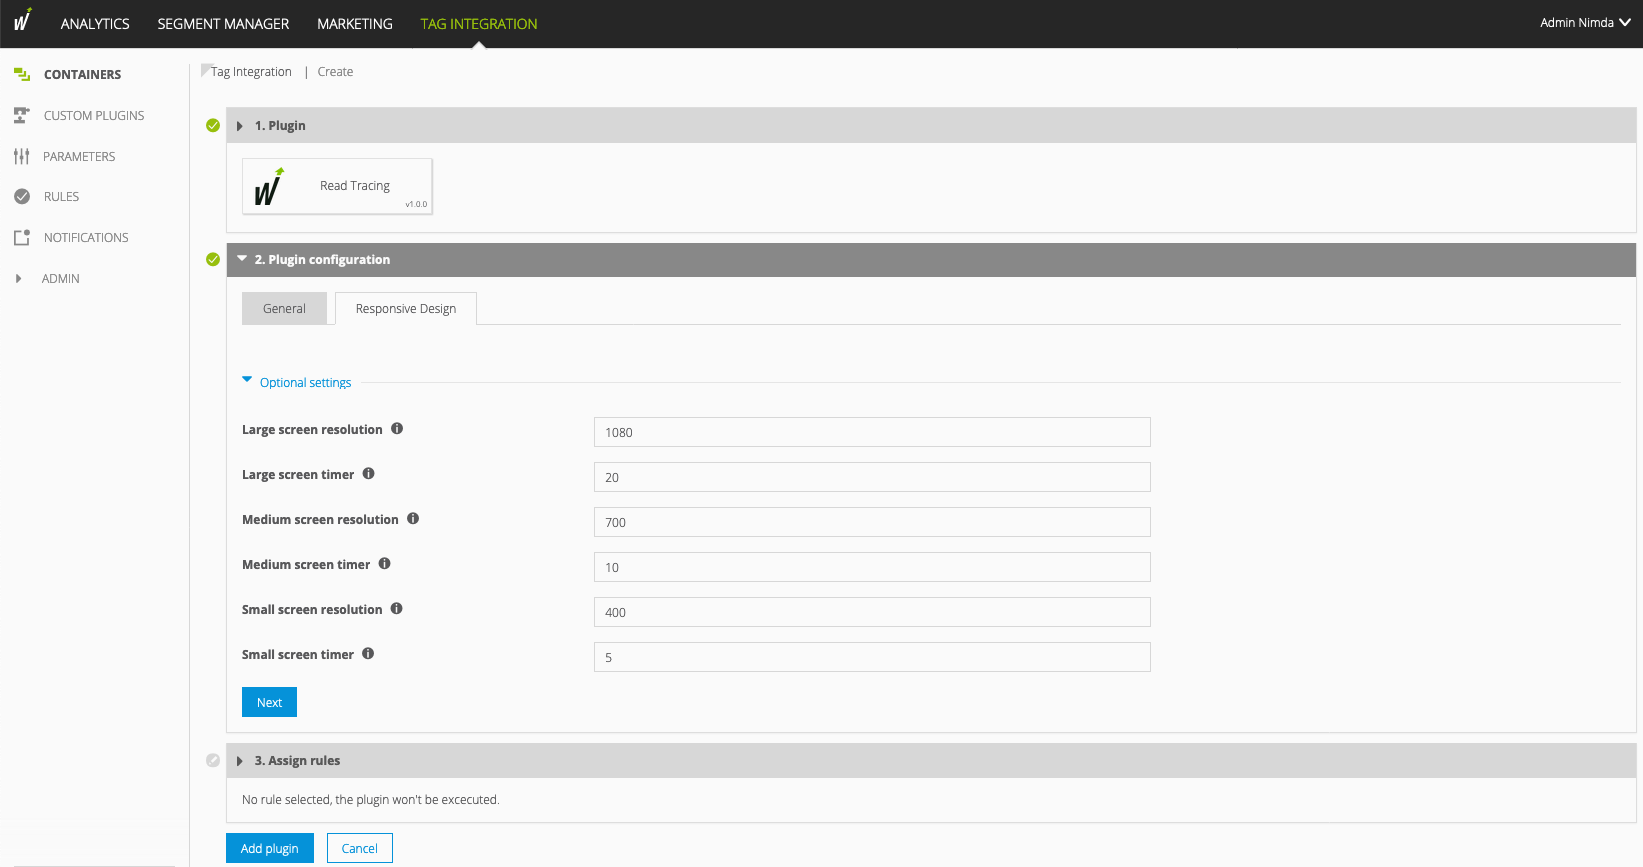
Parameter
Description
Large browser resolution Specify the browser resolution for large browsers in pixels (greater than or equal to the specified number of pixels). Seconds for large browser Specify the seconds to mark a section of the element as read on small browser resolutions (the element is divided into 200 sections). Medium browser resolution Specify the browser resolution for medium-sized browsers in pixels (greater than or equal to the specified number of pixels). Seconds for medium browser Specify the seconds to mark a section of the element as read on medium browser resolutions (the element is divided into 200 sections). Small browser resolution Specify the browser resolution for small browsers in pixels (greater than or equal to the specified number of pixels). Seconds for small browser Specify the seconds to mark a section of the element as read on small browser resolutions (the element is divided into 200 sections). - In the Assign rules area, you define the page areas on which the measurement is to be carried out.
- Click Add plugin.
Finally, click Publish.


- Download the JavaScript file.
In the JavaScript file pixel-contentengagement.min.js, make the following adjustments in the configuration object wt_contentEngagementConfig:
Examplevar contentEngagementConfig = { percentageStepsInAnalytics : 5, sendContentEngagement : 0, //0 = unload, 1 = percentageReached, 2 = secondsReached percentageReached : 25, secondsReached : 30, elementVisibilityFigure : '' largeBrowserResolution : 1080, largeBrowserSeconds: 20, mediumBrowserResolution : 700, mediumBrowserSeconds: 10, smallBrowserResolution : 400, smallBrowserSeconds: 5 };JSParameter
Description
percentageStepsInAnalytics Define the percentage intervals that are to be reported in Analytics (e.g., five means that the count is incremented in five steps). sendContentEngagement Specify the event that triggers the request to Analytics:
- 0 = On leaving the page: The user clicks a link, reloads the page, or is inactive until the end of the session.
- 1 = Percentage reached: The user exceeds a certain percentage (e.g., all 25% of the element).
- 2 = Seconds reached: After a certain number of seconds (e.g., every 30 seconds).
percentageReached If you specify "1" as the event trigger, enter the desired percentage here (e.g., at 25%, the event is triggered after every 25%). secondsReached If you specify "2" as the event trigger, define the desired interval of seconds here (e.g., at 30 the event is triggered every 30 seconds). elementVisibilityFigure By default, element visibility is sent with a predefined Mapp Intelligence parameter. This parameter is configured as 'text' and cannot be changed.
To use further analyses, you can additionally send the element visibility in a parameter configured as 'number' (Custom click parameter).
largeBrowserResolution Specify the browser resolution for large browsers in pixels (greater than or equal to the specified number of pixels). largeBrowserSeconds Specify the seconds to mark a section of the element as read on small browser resolutions (the element is divided into 100 sections). mediumBrowserResolution Specify the browser resolution for medium-sized browsers in pixels (greater than or equal to the specified number of pixels). mediumBrowserSeconds Specify the seconds to mark a section of the element as read on medium browser resolutions (the element is divided into 100 sections). smallBrowserResolution Specify the browser resolution for small browsers in pixels (greater than or equal to the specified number of pixels). smallBrowserSeconds Specify the seconds to mark a section of the element as read on small browser resolutions (the element is divided into 100 sections). Insert the script pixel-contentengagement.min.js before the script webtrekk_v4.min.js.
Example
<script type="text/javascript" src="path/to/file/pixel-contentengagement.min.js"></script> <script type="text/javascript" src="path/to/file/webtrekk_v4.min.js"></script>XMLThe parameter executePluginFunction is used for the activation itself. This can be set either in the configuration variable (webtrekkConfig) in the global pixel file (for example, "webtrekk_v4.js") or as a parameter of a page-specific pixel object.
The data acquisition is started as soon as the plugin is activated.
Example global configuration
var webtrekkConfig = { trackId: "111111111111111", trackDomain: "track.webtrekk.net", domain: "www.website.com", executePluginFunction: "wt_contentengagement" };JSExample page-specific configuration
var wt = new webtrekkV3(); wt.contentId = "en.home"; wt.executePluginFunction = "wt_contentengagement"; wt.sendinfo();JSIf you want to measure the data on all your pages, we recommend global integration. The page-specific configuration is used for the measurement of individual pages.
If you want to check if your configuration works, you can activate the debug mode in the plugin. Add the URL parameter or hash "wt_debug=1" to the URL.
Example
http://new.domain.com/start.html?wt_debug=1

or

http://new.domain.com/start.html#wt_debug=1
TEXT