Send Printed Birthday Card To Your High-Value Customers (Direct Mail)
With Direct Mail, you can take your marketing to the next level. In this scenario, we will show you how to surprise your high-value contacts with a printed birthday card and a coupon on their birthday. Your low and mid-value contact will receive an email and a push notification respectively.
Key Benefits
- Evoke positive reactions among your customers.
- Ensure a personalized and individual reach.
- Boost contact loyalty.
- Encourage new purchases.
Prerequisites
- Mailing address and date of birth available in your contacts' data.
- Activated optilyz integration in your Mapp Engage account.
Procedure
A) Set up a mailing automation in optilyz
Once your account in optilyz is set up, you have access to the automation creator. Your optilyz contact will help you create your templates.
What you need in advance:
- List of contacts with their mailing addresses in CSV format. You can export the list from your Engage system. For more details see Export Contact Data.
- The visuals you want to use for your sendout, in PDF format.
B) Prepare the messages
In our scenario, we differentiate the type of message based on the contact's value. To create this scenario, you will need to create and email message, a push notification and a direct mail message.
Detailed instructions for each of these message types are available in the following help articles:
In the Main Navigation, click Create New > Message > Email Message.
⇒ Step 1. Type of the message creation wizard opens.
When you create a message in Mapp Engage, do not open additional instances of Mapp Engage in other browser tabs or windows. If you have multiple Mapp Engage tabs open at the same time, there can be conflicts when you save your message drafts. If you attempt to save the same email in multiple browsers, changes can be lost.
- Enter your message information, select Email in the Type area, and click Create.
⇒ Step 2. Content opens. By default, step 2. Content of the message creation wizard opens in HTML Code mode. Use this mode to enter or edit the HTML code of your message manually. To enter or edit the HTML code of your message in a graphical HTML editor, click HTML Editor. To create or edit an email with HTML content, click Email (HTML).
⇒ The content area displays tools to format and edit your HTML.
To create or edit an email with plain text content, click Email (Text).
Many Mapp Engage customers create a message or a part of a message in an external tool and upload the content into Mapp Engage for sendout. To upload a message or message part, click Upload Message.
For more information, see Upload an Email or Email Part.
To add personalized content to your message, click Personalization.
⇒ The Personalization window opens.
Personalizations make the content of your messages more relevant. Add information from the profile of your contact to the message or use personalization rules to send different content to different recipients.
For more information, see Personalization.
To add other types of complex content to your message, click Mapp Engage Variables.
⇒ The Mapp Engage Variables window opens.
Mapp Engage Variables simplify the addition of many types of content:
System links (subscribe, unsubscribe, profile change)
Message and system data
Social network content
Coupons
Conversion tracking variables
Content
And more
For more information, see Mapp Engage Variables.
To access additional email settings and tools, click Advanced Options:
Attachments: Adds PDF files, text files, or images to an email message.
Character Encoding Select the encoding Mapp Engage uses for your message. UTF-8 is the default setting.
Image Handling: Inline images or host images on the Mapp Engage servers for sendout.
Message Category: Assign the message to a specific category.
Email Headers: Add header information to your message.
Click Save as Draft to save your email for later.
Click Prepare Sendout to configure your message for sendout.
When you create an email with HTML and text versions, Mapp Engage automatically creates a multi-part message. Mapp Engage sends both message parts together as a MIME message. Mapp Engage also considers the read-mode preferences of the contact. When Mapp Engage sends both HTML and plain text versions, the email client settings of the contact determine which version displays.
In the main navigation, click Create New > Message.
Select Push Notification.
Click Next.
Compose the content and personalizations for your push notification.
To save your push notification as a draft, click Save. A system message confirms that your push notification is saved.
To configure your message sendout, click Next.
Select the targeted audience: All opted-in users or Specific selection.
Choose the sendout time trigger: Immediately or Send notification at a specific date and time.
To review your sendout configuration, click Next.
To send your push notification immediately, click Send.
You will see a Send button if your notification should be sent immediately.
If your notification is scheduled for sendout in the future, you will see a Schedule button.
To save your message as a draft, click Save.
To leave the message without saving changes click Close.
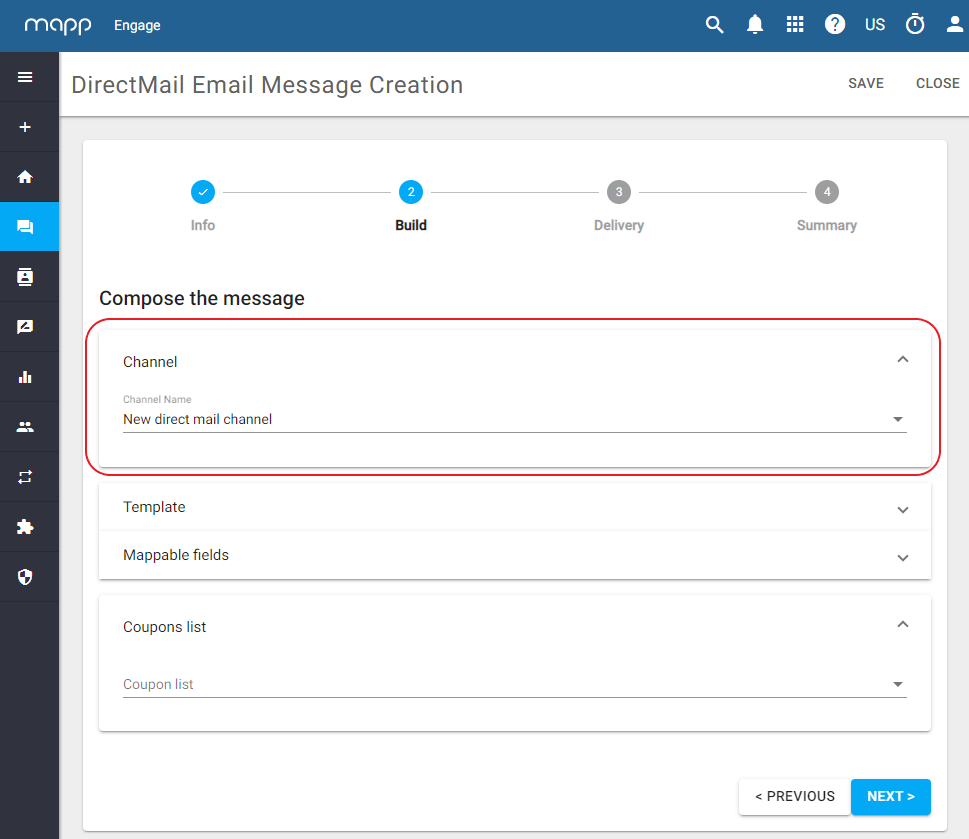
Go to Create > New Message > Direct Mail Message.
- Enter message name and if required, a description. Click Next.
- Select the direct mail channel you want to use for the message.
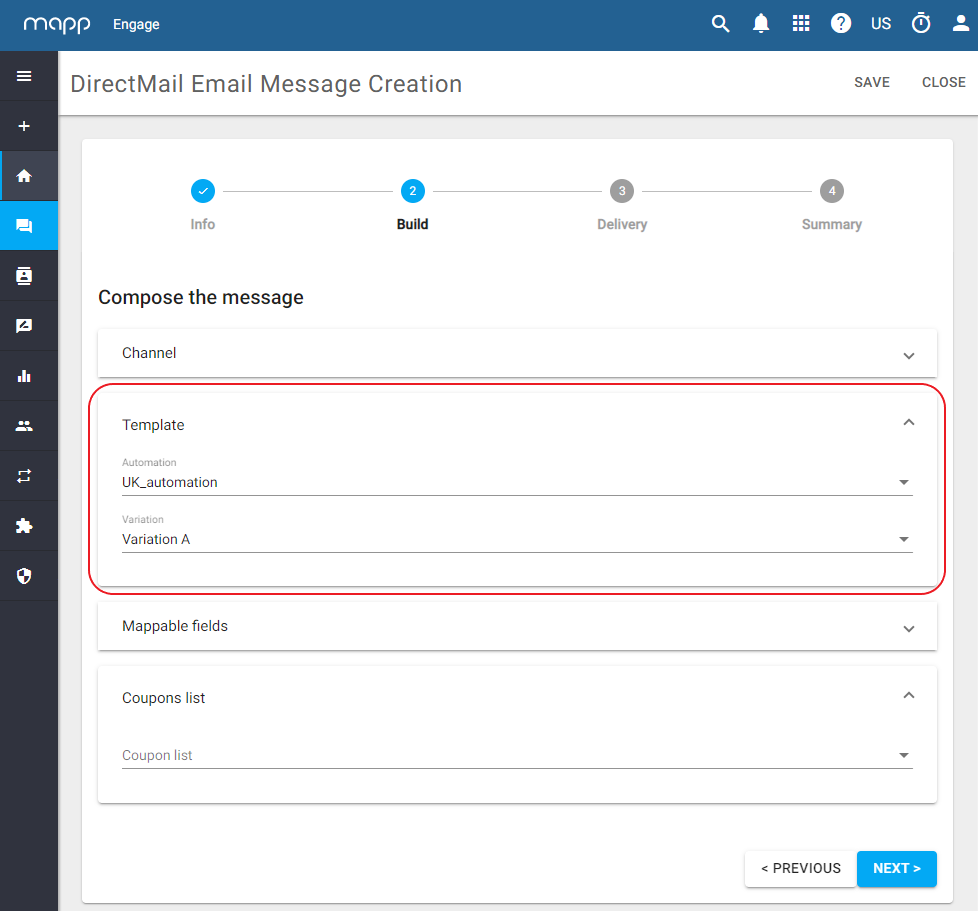
Select the required Template.

A Template is created in Optilyz. An Automation combined with a Variation constitute a Template.
Add personalization to the message. Click Next.
The mappable fields correspond to your Optilyz template. Personalize only those fields that are present in your template.
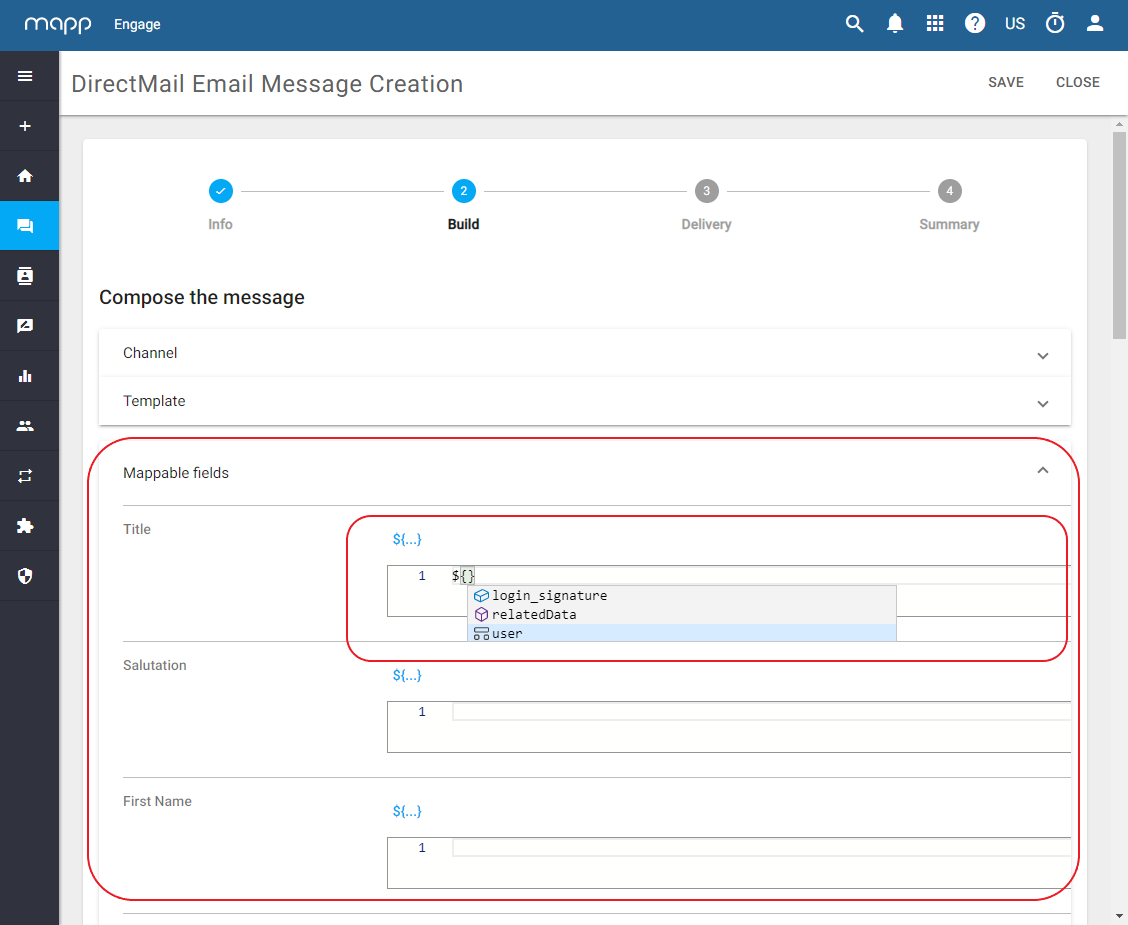

You can easily select elements of personalization from a predefined list in the message creation wizard.
Personalization with Related Data is also possible.
For more information about message personalization in Mapp Engage, see Personalization.
Custom Attributes which contain an upper-case letter are not recognized and cannot be used for personalization. You must manually change the upper-case letter to lower-case letter for the personalization to be applied.
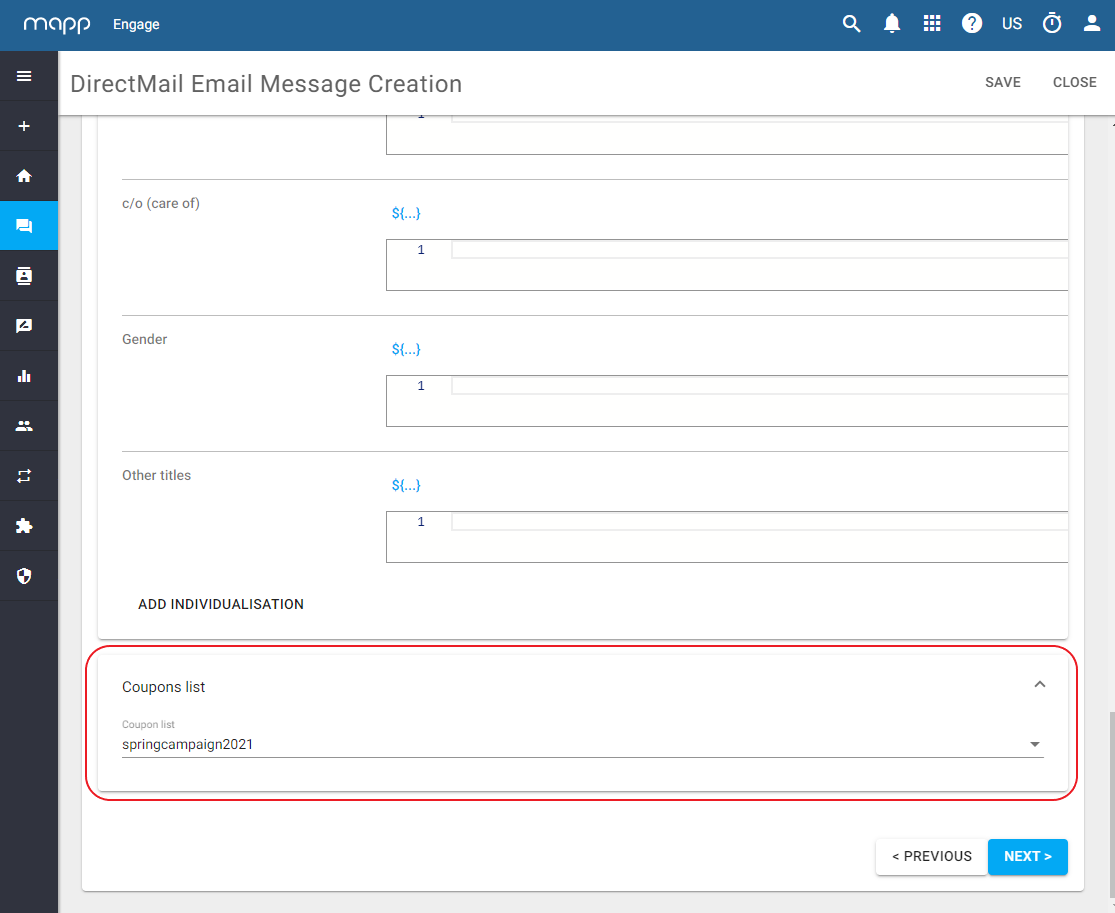
(optional) Click Add Individualization if you want to add more fields.
An Individualization is a personalization that you can freely define. For example, an individualization could be a text at the top of your printed sendout that says "Happy birthday", or "Spring Sale", etc.
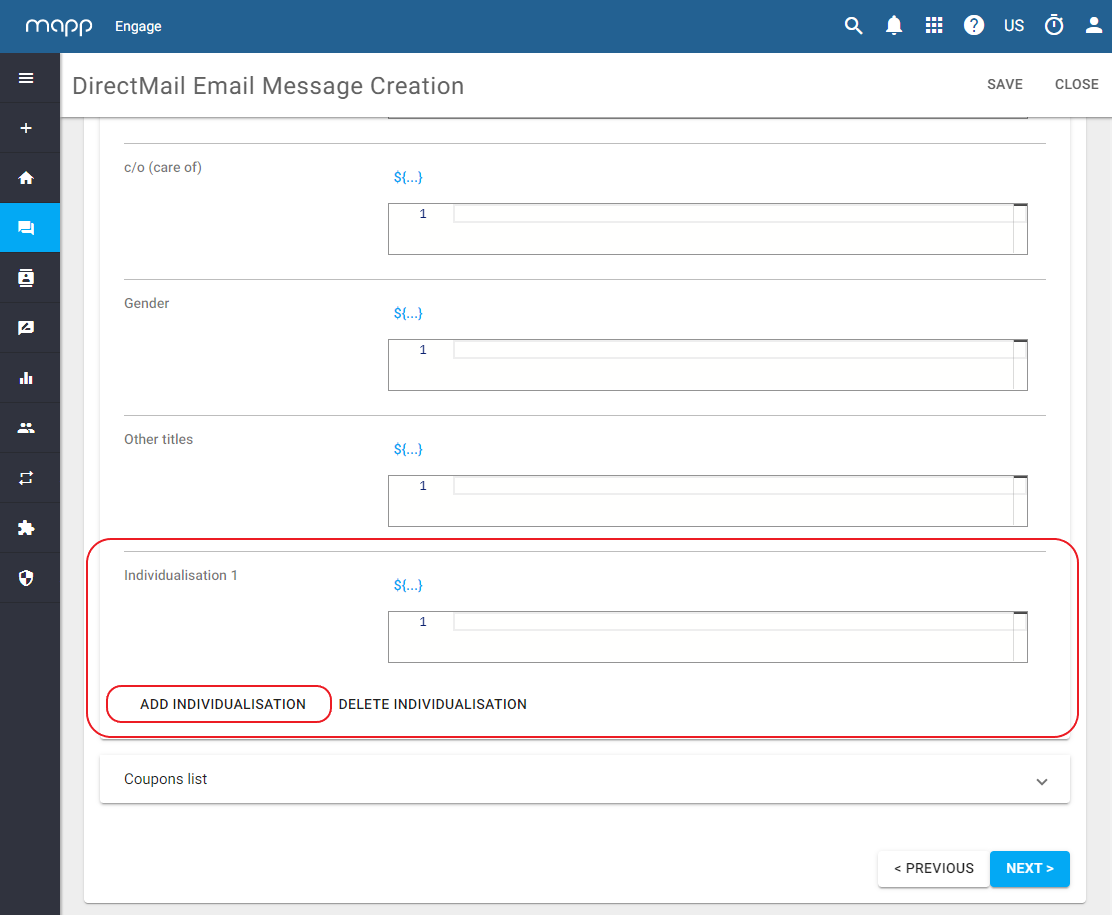
- (optional) Select coupon list from drop-down list.
Define the delivery:
- Time. This option allows you to send the message immediately, or at a specific date and time. It also allows you to select an audience.
- Whiteboard. This option saves the message as a prepared message and allows you to add it to a Whiteboard.
- Click Next. You can now see the summary of your message configuration.
- Click Save to save the message. Click Send to send the message immediately.
C) Create the audiences
Create three separates audience that identify the contact's date of birth and whether they are a low, medium or high value customer.
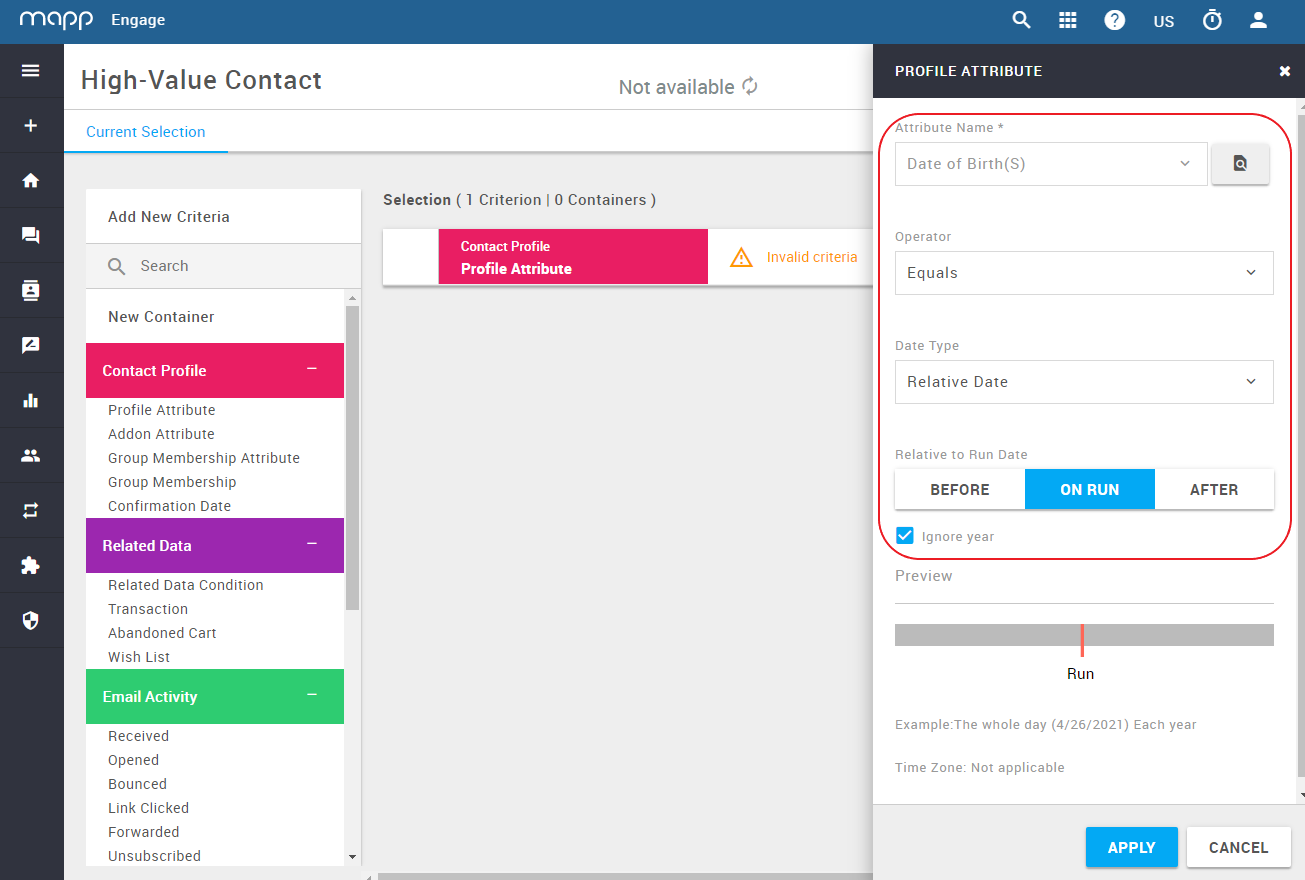
- Go to Contacts > Segmentation Builder and create a new segment.
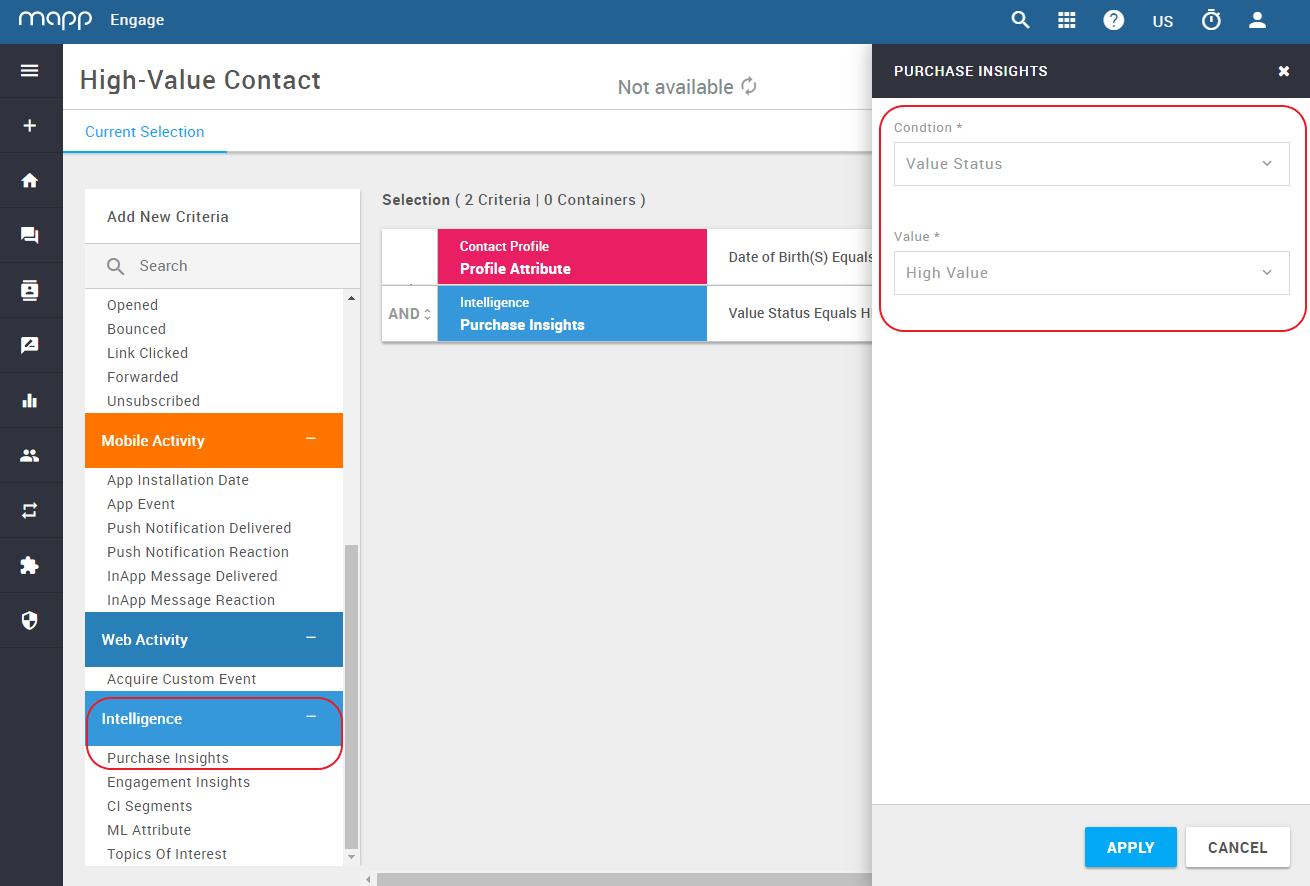
In our example, the segment is called High-Value Contact. - Drag and drop the Profile Attribute criterion onto the canvas.
- Click the pencil to edit the criterion:
- Attribute Name: Date of Birth(S)
- Operator: Equals
- Date Type: Relative Date
- Relative to Run Date: On Run
- Check the Ignore Year check-box and click Apply.
- Drag and drop the Purchase Insights criterion onto the canvas.
- Click the pencil to edit the criterion:
- Condition: Value Status
- Value: High Value
- Click Apply.
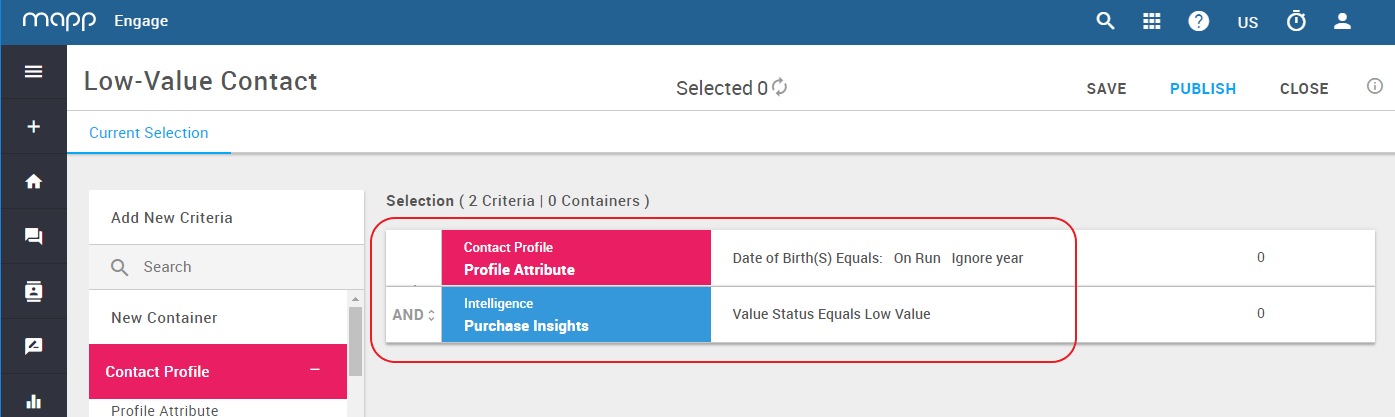
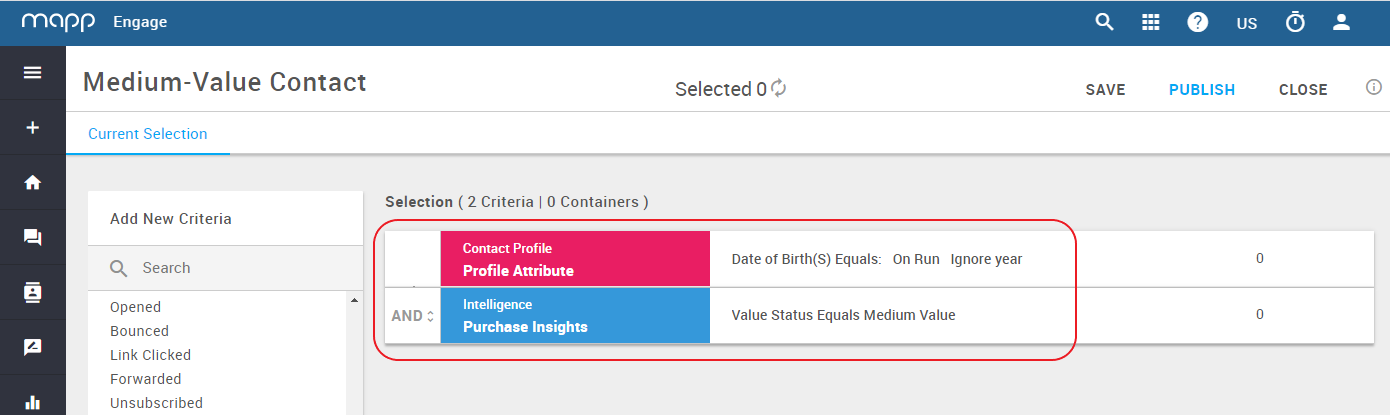
Create two more segments: one with Value: Low Value, and one with Value: Medium Value.
To gain better control of your spend, you can limit the size of your segment.
- Open the desired segment and click
 .
. - Under Limit the search results select Yes.
- Under Value enter the maximum cap for your selection. Ready!
For more information, see Contact Counts in Segmentation Builder .
- Open the desired segment and click
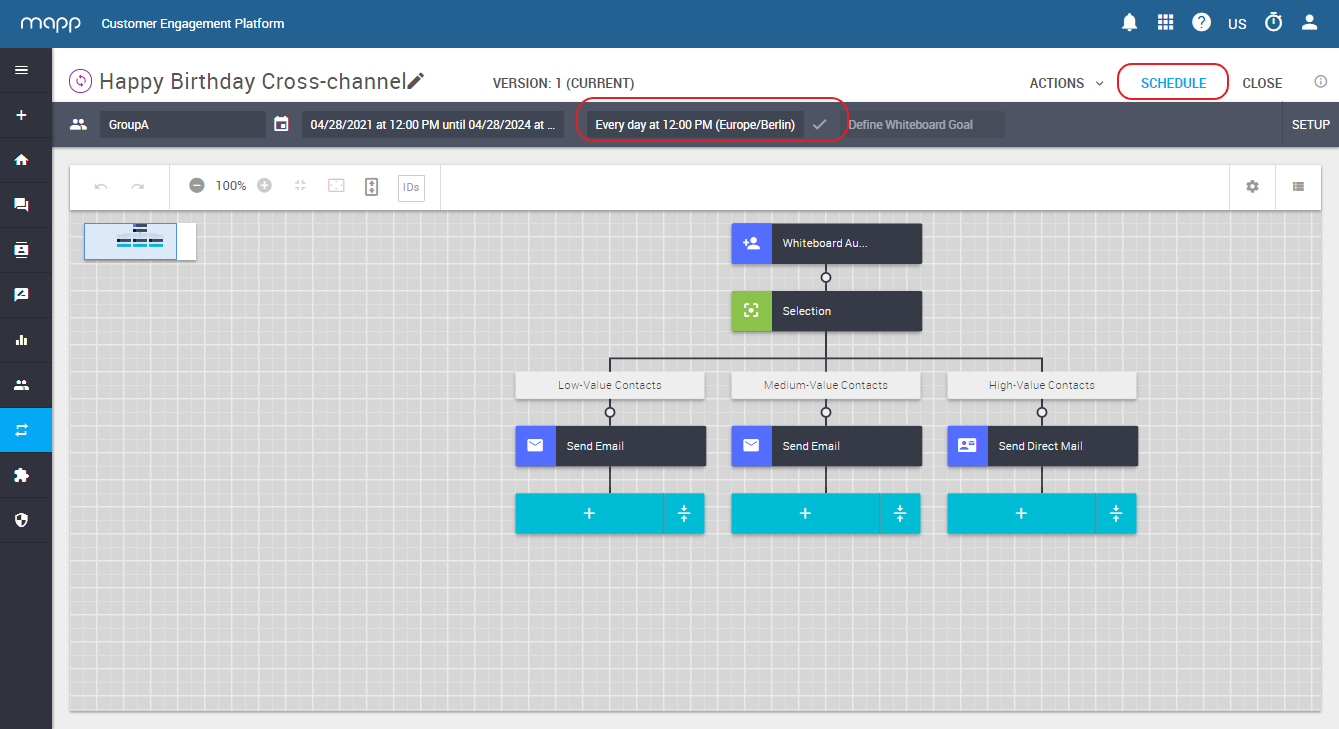
D) Build the Whiteboard automation
Create a time-based Whiteboard that runs daily and sends an email to low-value contacts, a push notification to medium-value contacts and a direct mail to high-value contacts.
- Create a new Whiteboard.
- Select the required Group.
- Set Enrollment Settings to Multiple Times.
- Click Apply.
- From the Filter section chose Selection.
- Add three positive paths, each with one selection:
- Low-Value Contacts
- Medium-Value Contacts
- High-Value Contacts.
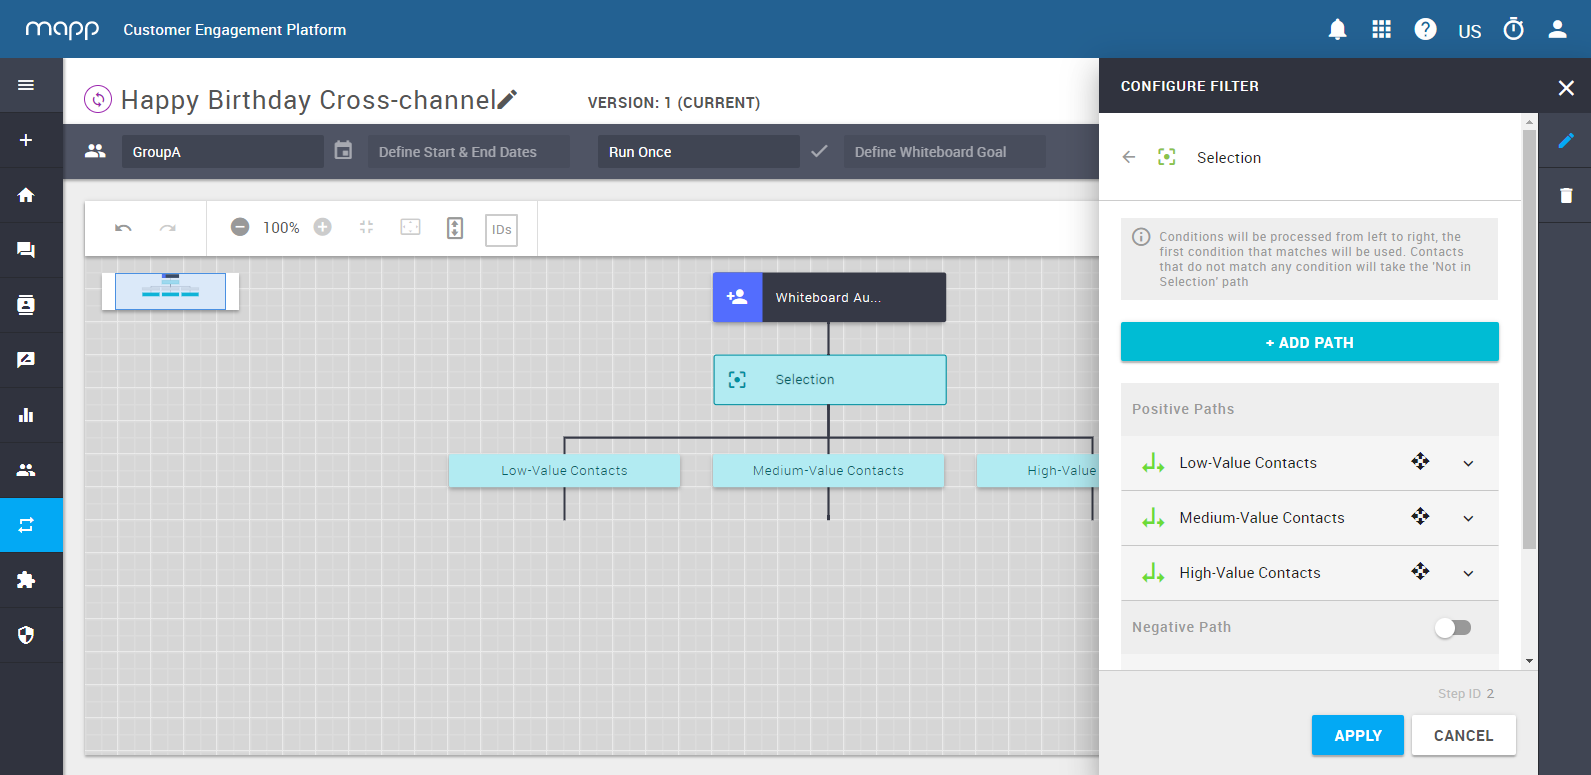
- Click Apply.
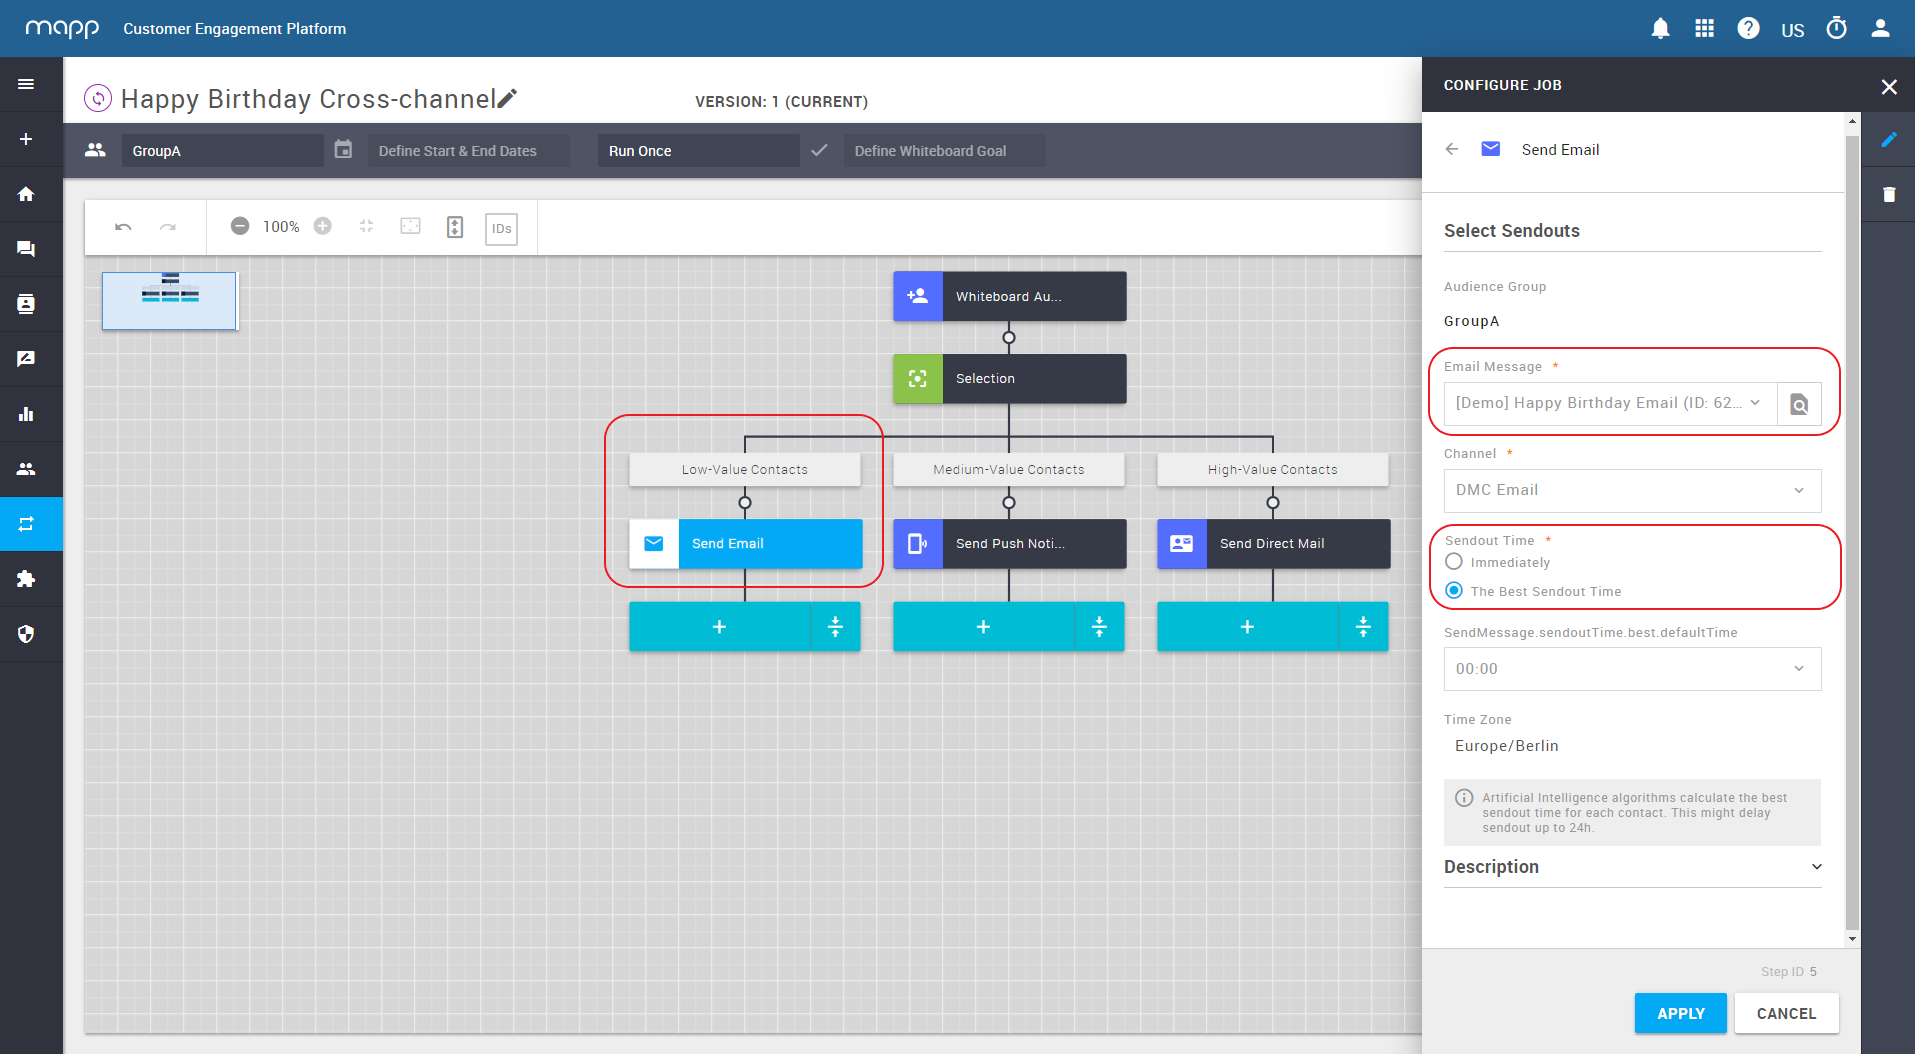
- Go to Low-Value Contacts and add the step Send Email.
- Select the prepared email message.
- Select The Best Sendout Time and click Apply.
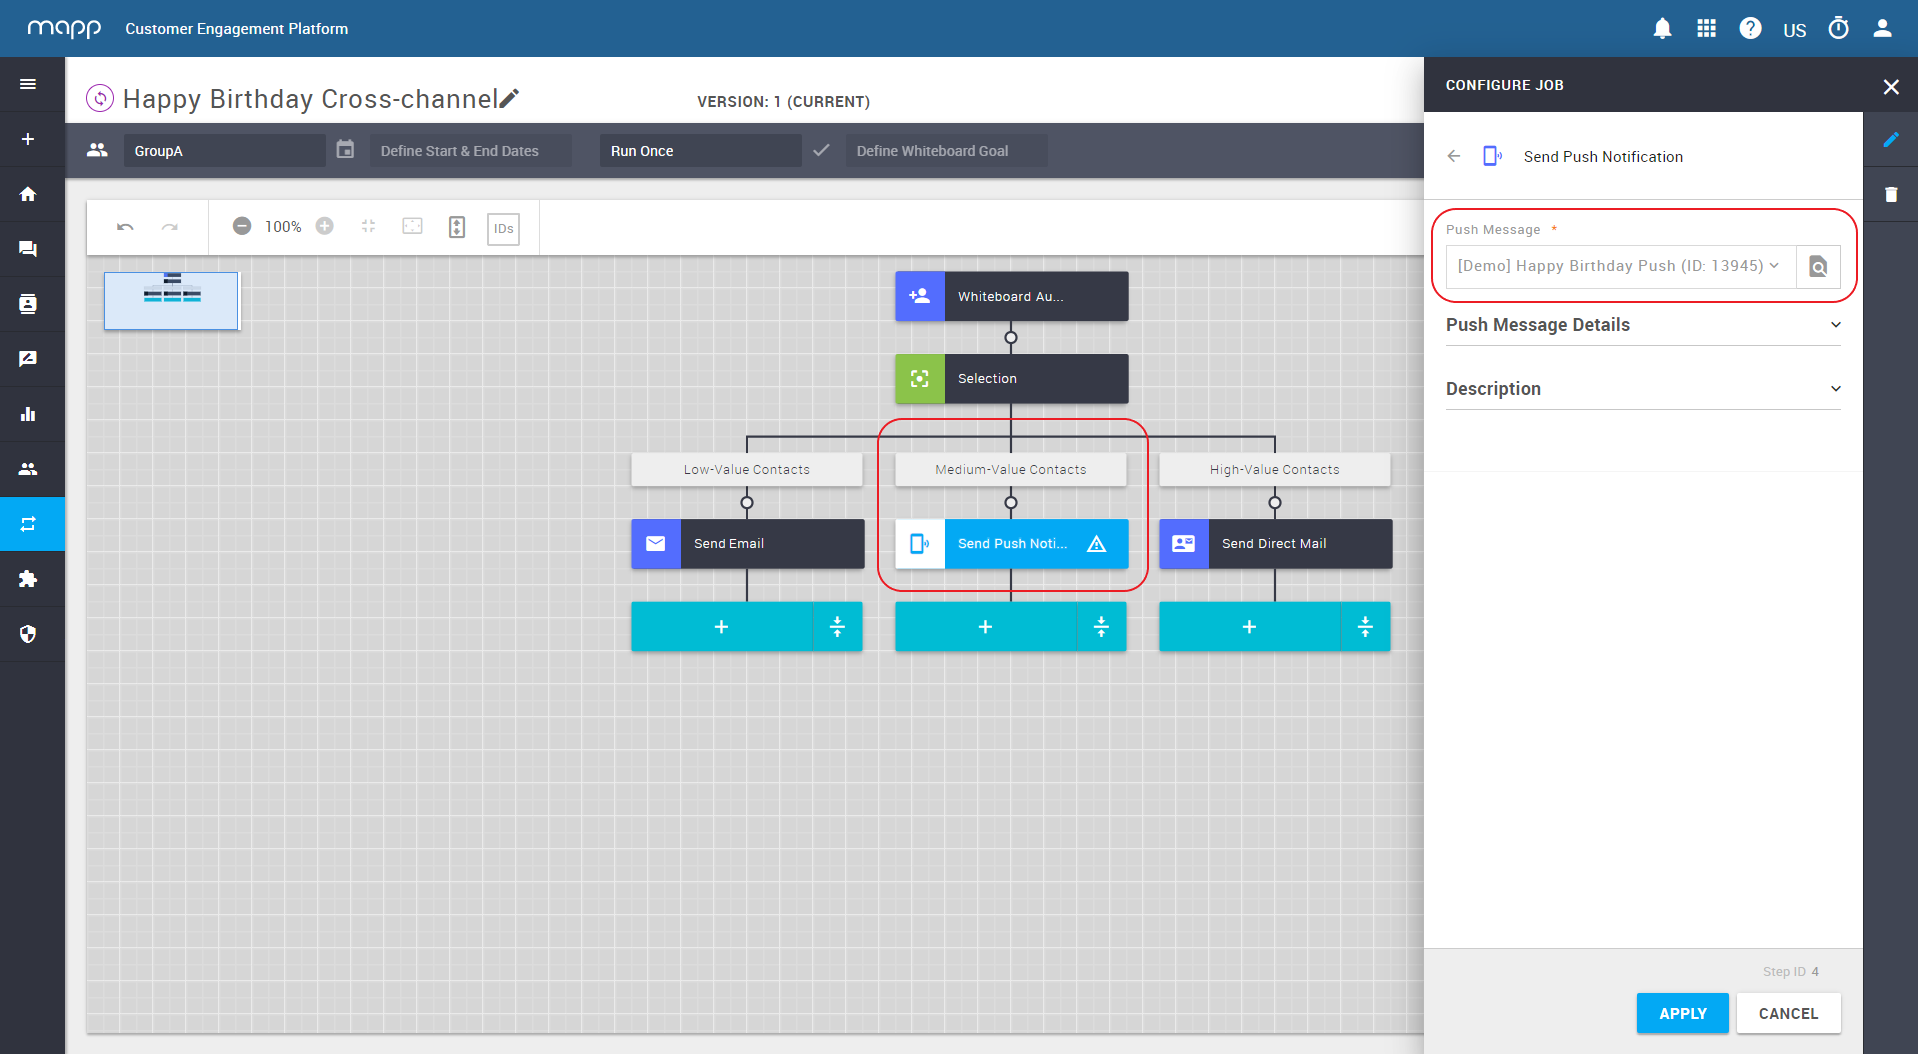
- Go to Medium-Value Contacts and add the step Send Push Notification.
- Select the prepared push notification and click Apply.
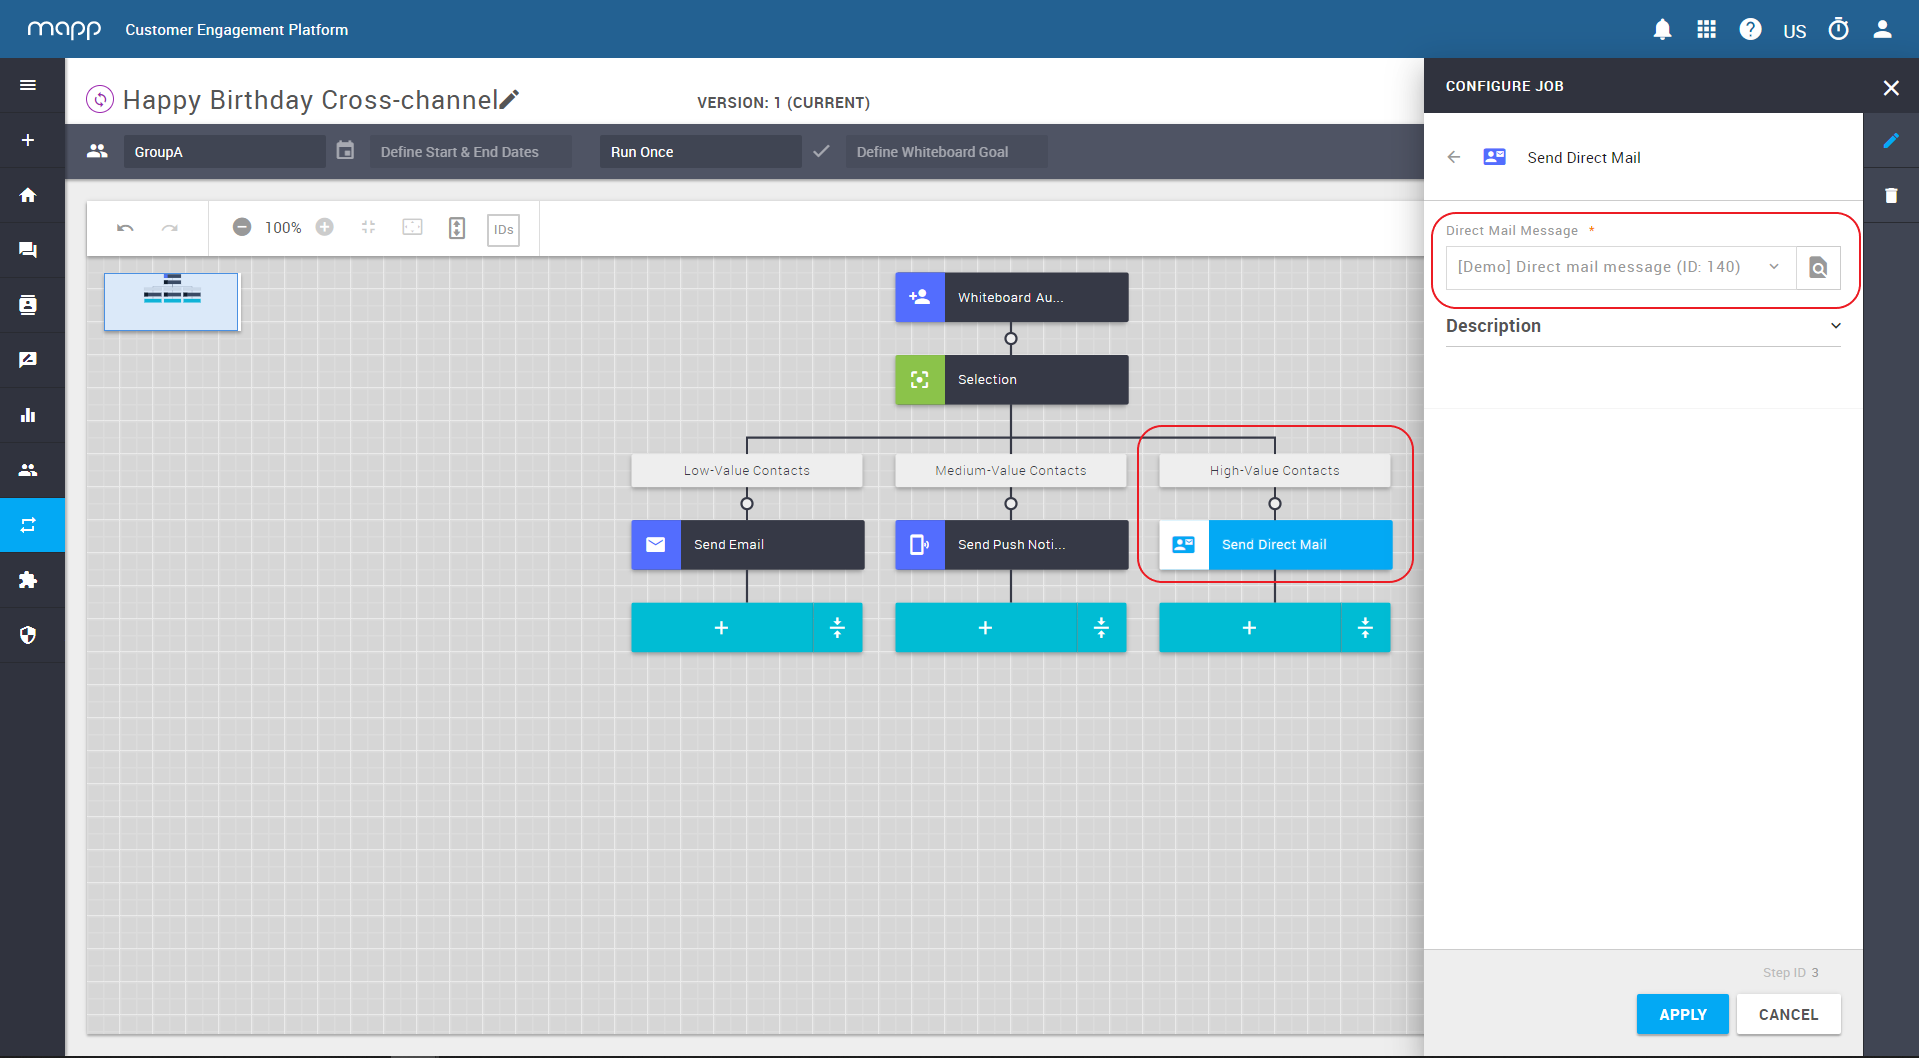
- Go to High-Value Contacts and add the step Send Direct Mail.
- Select the prepared Direct Mail Message and click Apply.
- Validate and save the Whiteboard.
- Click Setup and select Recur on scheduled dates and times . Click Apply.
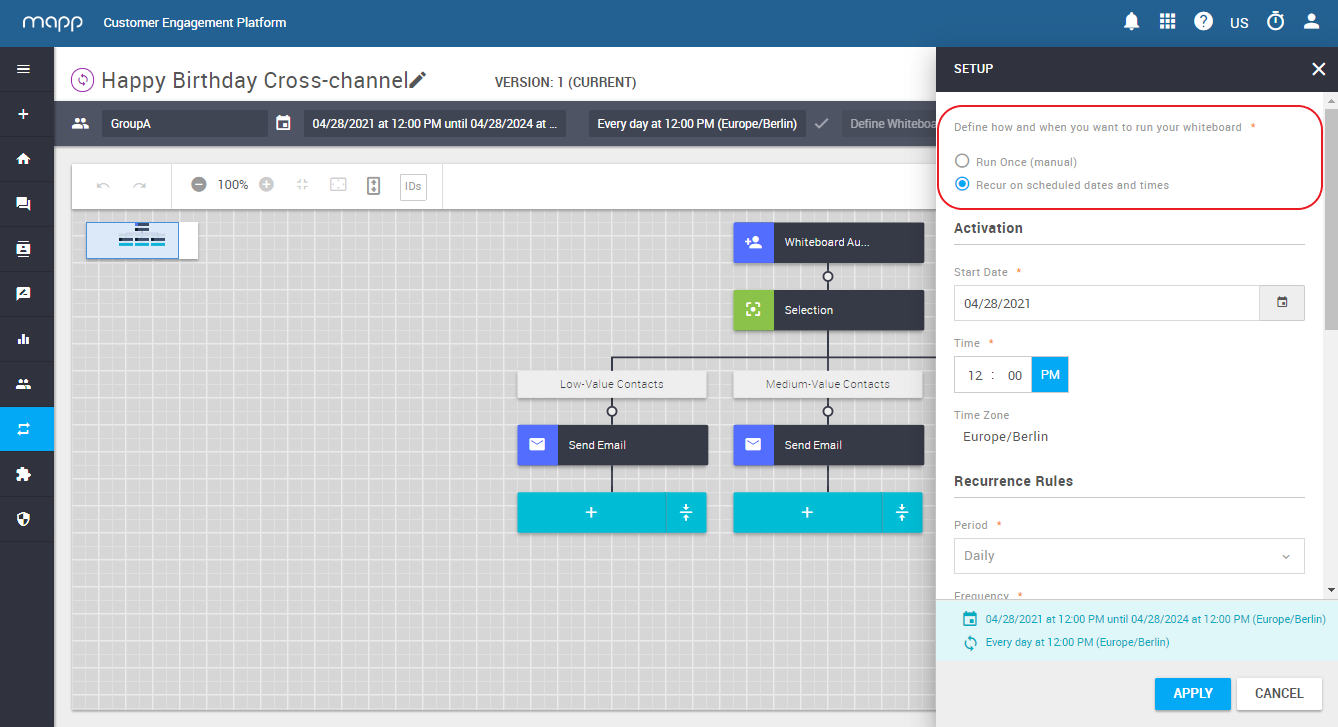
- Click Schedule . Ready!