Power BI
1. What Is Power BI?
Microsoft Power BI is a data analysis tool that allows users to generate different graphics and reports for data analysis and business intelligence purposes. Data can be imported to Power BI from sources such as:
- files,
- databases,
- web services,
- Microsoft Azure services,
- 3rd party services.
There are two main version of Power BI: Power BI Desktop and Power BI Cloud.
- The Power BI Desktop version has a wide range of connection possibilities. Learn more...
- The Power BI Cloud version is limited to files, some Azure-based Database data sources and streaming datasets. Learn more...
Example using Kerberos (GSSAPI). Customers will use SCRAM-SHA-256):Version | Platform | Data Sources | Streaming Data Sources | Advantages | Disadvantages |
|---|---|---|---|---|---|
| Cloud | All (Browser-based) |
|
|
| |
| Desktop | Windows |
|
|
|
|
2. Proposed Architecture For Power BI Desktop
2.1 Description
If you store your analysis data on SQL Server, MariaDB, PostgreSQL or similar, Kafka Connect should be an alternative to consider.
Here is how a typical set-up would look like.
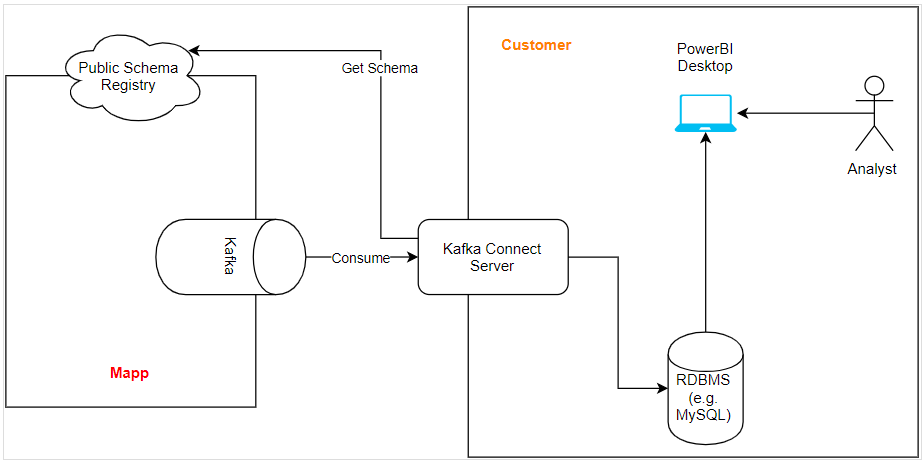
Mapp architecture: Public Kafka which contains the topics that represent the Streams of Data Streams (Root / Custom).
This will be configured to consume from Mapp Public Kafka and to write the events into the Database of your choice using the JDBC Sink Connector for Kafka Connect (Confluent Community License) in an appropriate table form. Then the data can be read from Power BI Desktop.
2.2 Requirements
- At the moment, only Avro Streams can be used for this since they contain schema information.
- JSON Streams cannot be used since Mapp is not including schema information on them (read more...). The schema needs to be included by the RDS Replicator or by KSQL.
- Both Root and Custom streams are in theory suitable to be consumed by Kafka Connect.
- Primitive Types can be selected and should be mapped to the respective column in the corresponding table.
- Nested Types (Array, Record, etc.) are supported but they need to be flattened first using a Single Message Transformation.
- The usage of custom streams may be easier due to the flattened structure.
- If the use case is more complex, implementing a custom converter may be necessary.
- Destination table names can be set using table.name.format. However, the
${topic}placeholder cannot be used since the generated SQL conflicts with Mapp's topic names (due to using dots). - The property batch.size in the JDBC Sink Connector can be adjusted accordingly, depending on the account traffic to get the desired update pace in the database.
- It is possible to define the Primary Key in the destination table by setting it to the Kafka record key (session ID), to a field of the Kafka record value (e. g. request ID) or nothing at all.
- The columns of the destination table can be set using a whitelist of fields in the record.
- Latency should be acceptable despite the introduction of Kafka Connect.
- The data needs to be transferred over the internet and Kafka Connect needs to write the data into the Database and Power BI needs to read it.
- Kafka Connect can be scaled-up by running it in distributed mode and adding multiple servers.
- The database can usually be scaled-up vertically.
2.3 Set-up
- Kafka user has rights to consume from the Custom Avro Stream.
- User has Kerberos ticket for that user (e.g. your own user).
- Work is done in a MacOS / Linux environment.
- MariaDB or MySQL databases are used. If not, a test MariaDB can be set up quickly with Docker .
2.3.1 Setting Up The Stream
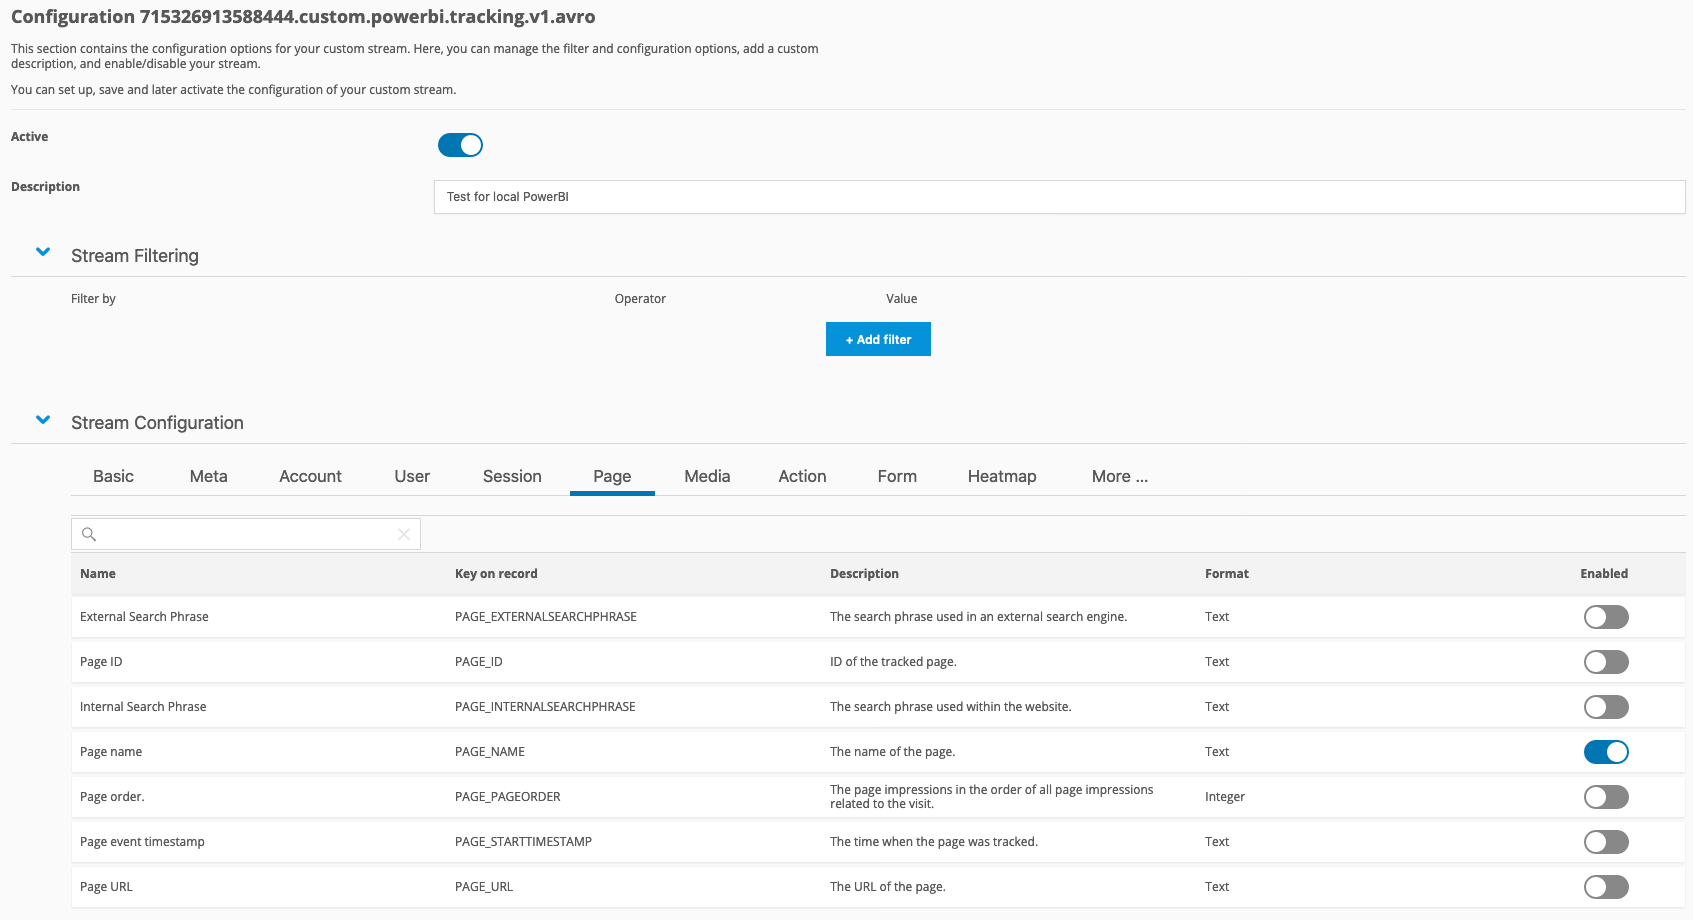
- Set up the stream via Mapp Intelligence > Data streams.
- Create a Custom Avro Stream and project the Page Name.
Example:
2.3.2 Downloading Kafka and Dependencies
Prepare the local setup of Kafka Connect.
- Download the latest version of Kafka from their website and unpack the downloaded file.
- Include the JDBC Sink Connector (jar) and the Confluent Avro Converter dependencies in the Apache Kafka setup.
- Place the JDBC Sink Connector JAR in the Kafka folder under a new subfolder named
connect-plugins. - The Confluent Avro Converter ZIP includes also docs and assets. Decompress it and copy the contents of the
libfolder into the folderlibsof the Kafka setup.
2.3.3 Setting Up The Kafka Connect Configuration
- Configure the Kafka Connect Standalone service with a properties file (examples are provided in the
conffolder of Kafka). - Name it, for example,
connect-standalone.propertiesand place it in theconffolder of the Kafka setup.
|
2.3.4 Setting Up The JDBC Sink Connector Configuration
- Configure the JDBC Sink Connector with another configuration file.
- Name it, for example,
jdbc-sink-connector.propertiesand that we will place it under theconffolder of the Kafka setup:
|
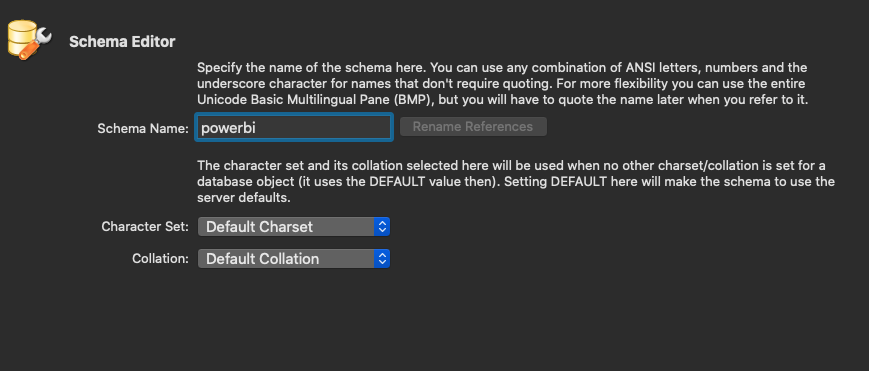
2.3.5 Creating a new Database
Create the database powerbi that we defined in the JDBC connection string in our database. For MariaDB, you can use MySQL Workbench or another tool of your choice.
2.3.6 Setting Up JAAS Configuration File
Prepare the JAAS file, for instance client_jaas.conf, and place it in our Kafka setup folder.
Example (using Kerberos (GSSAPI), you will use SCRAM-SHA-256).
|
2.3.7 Running Kafka Connect
- Export the environment variable
KAFKA_OPTSwith the-Djava.security.auth.login.configJVM flag that will indicate where the JAAS file for authentication is located (the one you created in the previous step).
|
2. Get a Kerberos ticket for authenticating. This is usually done using kinit:
|
3. Run Kafka Connect in Standalone mode (assuming you are located in the Kafka folder and you have placed both configuration files under config):
|
4. Wait until Kafka Connect Standarlone boots up. Below is an example of what you will see once this is done.
|
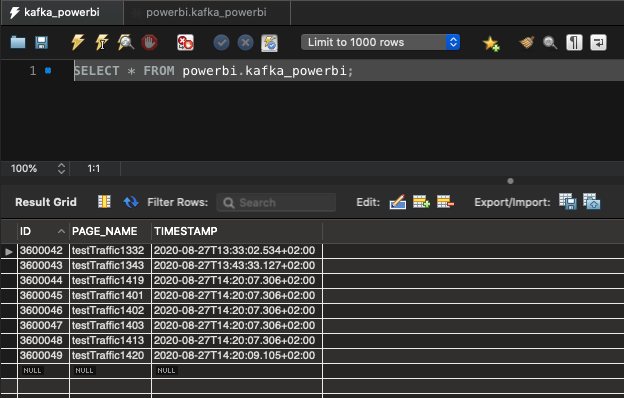
2.3.8 Testing Kafka Connect
- Send a dummy requests with a page name (since you enabled that field in the stream projections) to your Tracker.
|
2. Use XXXX to set some time to track our requests in the result.
3. Check if you see the requests in Kafka.

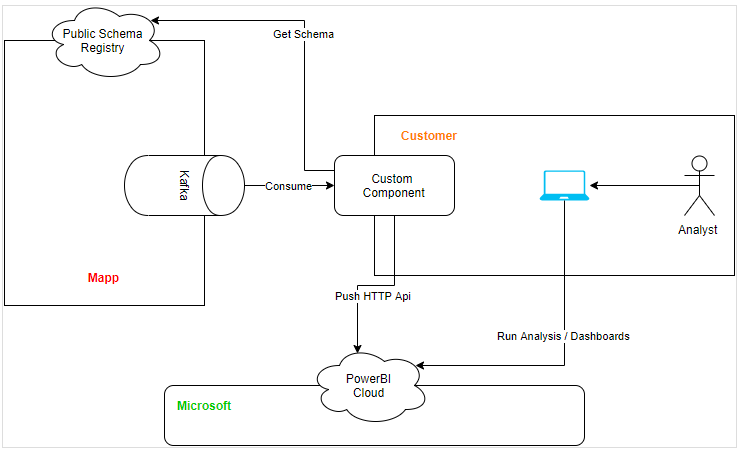
3. Proposed Architecture For Power BI Cloud
If you prefer Power BI Cloud over Power BI Desktop, and have an Azure subscription, you can follow the same steps as for the desktop version, and use Kafka Connect to pump the data into an Azure SQL Database. Add Azure SQL Database as a Power BI data source and create the dashboards and reports from there.
If you don't have an Azure, nor a PubNub subscription, you can still use the HTTP API to push data into Power BI. However, this requires building a custom component that reads the data from Kafka and pushes records to Power BI Cloud via the HTTP API.
A Kafka Connect HTTP Sink Connector that does this job using Kafka Connect is available under a Confluent commercial license.
The Confluent HTTP Rest Kafka Proxy is not suitable for this task since it is a pull-system. This means that it can be called to consume data form Kafka, but does not push data anywhere by itself.
4. Summary
4.1 General
- Power BI is a data analysis tool that allows users to extract business intelligence from multiple sources of data by means of reporting and dashboarding.
- Power BI exists in both cloud and desktop version.
- Power BI Desktop only runs on Windows but it accepts a vast number of connectors (file, databases, third party data sources, etc.).
- Power BI Cloud is browser-based but it has limitations on the amount of data-sources that can be used.
- Both Cloud And Desktop versions are rich in analysis and reporting features.
4.2 Power BI Desktop
- The solution involves running a Kafka Connect instance (standalone or distributed if needed) with the Confluent JDBC Sink Connector (Confluent Community License).
- Kafka Connect dumps Kafka records into a CSV file, and these are imported manually into Power BI (less practical solution).
- The data is written in batches of configurable size by Kafka Connect into a database using JDBC.
- The data is read by Power BI at regular short times to give the impression of a streaming system.
- There is no real streaming support (e. g. consuming directly from Kafka into some internal storage of Kafka) so data must be stored first in a database.
4.3 Power BI Cloud
- There are two kinds of data sources:
- Dataset: Files and Azure databases.
- Streaming Dataset: HTTP Rest Push API, Azure Streaming or PubNub.
- Kafka Connect dumps Kafka records into a CSV file and these can be imported manually into Power BI (less practical solution).
- Datasets require either manual effort or an Azure subscription to dump the data into Azure SQL. For Azure Data Warehouse products, this can be implemented as with Power BI Desktop.
- The Streaming Push HTTP API cannot be used with Kafka Connect since the Kafka Connect HTTP Sink Connector from Confluent is a commercially licensed product.
- The Streaming Push HTTP API cannot be used with Confluent Kafka HTTP Proxy since it is a pull-only system.
- In order to implement this without using commercial products, it is necessary to build a custom component that would consume from Kafka and push into Power BI via the Streaming Push HTTP API.
4.4 Recommendation
- Stick to Power BI Desktop.
- Use a RDBMS compatible with JDBC (MariaDB, PostgreSQL, etc.).
- Pump the data from Kafka using Kafka Connect via the JDBC Sink Connector.
- Perform Power BI Desktop analysis from the database data source.