Contact Profile
Navigation Path
- In the Main Navigation, click Audience > Administration.
⇒ The Contact Management window opens to the Group tab. - Click All Contacts.
⇒ An overview of all the contacts in your system opens. - In the Actions column, click the
 symbol.
⇒ The Contact Profile window opens to the Summary tab.
Purpose
This window shows all the information that is stored in the system for the selected contact. Here you can view and update the profile data of the contact.
What can I do in this window?
Manually check and edit the profile information of a contact.
Manually check and update attribute information of a contact.
Manually check and edit how a contact is identified in the system.
Check which profile attributes are channel-specific, generic, or available for all channels.
View the activity history of a contact for the past 30 days.
Filter activity history by time frame, activity type.
These action buttons appear on the top right side of the Contact Profile window.
Action | Description |
|---|---|
Export | Exports the information of the contact. For more information see Export Contact |
Anonymize | Encrypts the information on the contact with a SHA3-256 hashing algorithm. This hashes the address, profile data, and message history for this contact in the entire system. This action cannot be reversed. For more information see Anonymize a Contact |
Save | Saves changes that you enter in the Contact Information panel or Attributes area and closes the window. |
Close | Discards your changes and closes the window. |
These options appear at the bottom of the page and allow you to adjust the view of the tab.
Attributes per Page | Changes the number of attributes that are displayed per page. |
Page | Shows the page number. |
Number of Attributes | Shows the numbers of the attributes that are displayed currently. The system numbers the attributes sequentially. |
| Navigates to the previous page of records. |
| Navigates to the next page of records. |
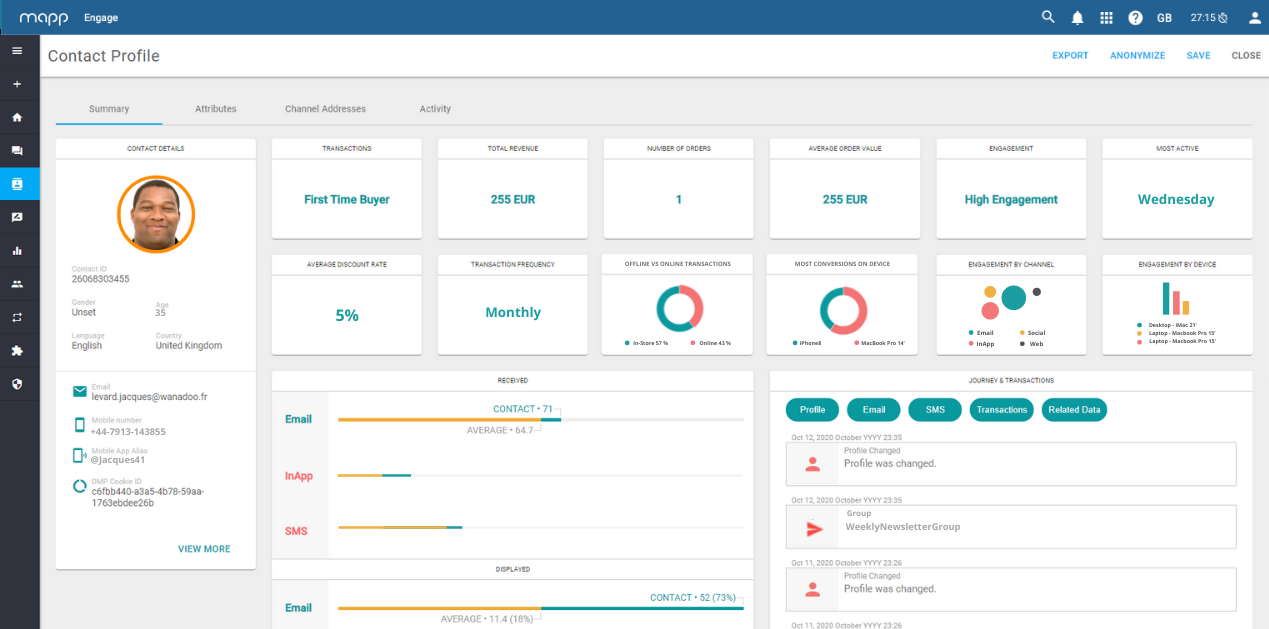
Summary tab
This is the unified customer profile, showing all key data at a glance.
| Information card | Description | ||||||||||||||||||||||
|---|---|---|---|---|---|---|---|---|---|---|---|---|---|---|---|---|---|---|---|---|---|---|---|
Contact Details | Shows an overview of your contact's basic information. For more detail see the Attributes section below. View More: takes you to the Channel Addresses tab. | ||||||||||||||||||||||
Transactions | Shows contact status based on their loyalty and value.
| ||||||||||||||||||||||
Total Revenue | Sum of all order values. If the currency is not set, the calculation will use the system default currency. | ||||||||||||||||||||||
Number of Orders | The count of unique orders (orderId) with at least one product. | ||||||||||||||||||||||
Average Order Value | Total Revenue divided by the Number of Orders for one contact. This value is rounded to two digits after comma. | ||||||||||||||||||||||
Engagement | Engagement is calculated based on data from the last 12 months.
| ||||||||||||||||||||||
Most Active | The day of the week when the contact opens and clicks the highest number of messages. This calculation is based on the aggregated number of events (opens and clicks) that occurred in response to communication from Mapp Engage. Each open and click is counted separately, no matter if they are related to the same message or not. Opens have a weight of 1, and clicks, a weight of 2. | ||||||||||||||||||||||
Average Discount Rate | Sum of the discount percentage (discountPercentage) and order discount (discountValue) divided by the number of orders that have at least one discount (percentage or value). This value is rounded to two digits after comma. | ||||||||||||||||||||||
Transaction Frequency | Number of Orders (with at least one product) divided by (the number of full years + 1) from the first transaction with the precision to one decimal. Returns are subtracted from the number of orders. | ||||||||||||||||||||||
Engagement by Channel | Count of all year-to-date responses from the contact, aggregated by channel (Email, SMS, InApp).
| ||||||||||||||||||||||
Engagement by Device | Device details are retrieved from each event. Detailed information is stored for top five most used devices. The device information is stored in the following format: DeviceType_HardwareModel_NumberOfEvents. For example:
| ||||||||||||||||||||||
Received |
| ||||||||||||||||||||||
Displayed | The total number of email messages opened in the last 12 months | ||||||||||||||||||||||
Engaged |
| ||||||||||||||||||||||
Journey & Transactions | Shows recent activity related to the contact profile. You can filter by Profile, Email, SMS, Transactions and Related Data. |
Attributes tab
Contact card
This card displays the information that identifies the contact within the system. To be stored in the system, each contact must have a contact ID and at least one identifier. Identifier data is specific to a single contact.
Mapp Engage uses information from different channels as unique identifiers. In email messaging, the identifier is connected to legal requirements for subscription and unsubscription.
During import, the system checks new contact data against the profile data that is already stored in the system. This check guarantees that the correct profile is updated.
You can manually update information on the contact card in the Contact Information panel. To open the panel, click anywhere within the contact card. The Contact Information panel opens on the right side of the window. Here you can add and update the information that the system stores in the profile of the contact.
If your system is specially configured to allow multiple contacts with the same email address, then many standard functions are not available. In that case, the legal status of the subscription processes cannot be guaranteed. For more information, contact your customer success or account manager.
Information Card | Description |
|---|---|
Contact image | Status | Shows the status of the contact within the system. A green icon indicates active status. A gray icon indicates that the contact is deactivated in the system. Active contacts usually receive messages. However, active contacts can be excluded from sendouts for various reasons. For example, the contact is on a Robinson list or blacklist, a selection excludes them, or their message limitation is reached. Deactivated contacts usually do not receive messages. However, if you specify in the group settings that system-wide deactivated contacts continue to receive messages, you bypass the deactivation. |
Contact ID | Shows the contact ID that the system assigns automatically when a new contact is added to the system. The contact ID cannot be changed or edited. |
Optional Identifier | Shows an optional identifier that is assigned to the contact. For example, an identifier that is used to synchronize contact profiles in the system with an external application. This identifier must be unique if you use it for contact import or subscription processes. It must not be unique if you use it as additional information for automation or personalization. |
Email | Shows the email address that is used as an identifier. |
Mobile Number | Shows the mobile phone number that is used as an identifier. The format is + country code. For example, +49 123 4556. |
Mobile App Alias | Shows the mobile app alias that is used as an identifier. The identifier is entered as a string. The mobile app alias identifies the contact who installed your app. |
| DMP Cookie ID |
Attributes search and filter panel
In this panel, you can search for attributes by the attribute name or type, filter and sort.
Name | Description |
|---|---|
| Searches for attributes that match the entered value. |
| Limits the attributes that the system displays to the selected attribute type. To select or deselect an attribute type, click the checkbox. Selected items are indicated with the The following attribute types are available:
|
| Orders the attributes alphabetically from A–Z or Z–A. |
Attributes list
This area displays all attributes that match your filter criteria and identifies the attribute type. To edit the content, click the attribute card.
Standard attributes are available on every system. All other attributes vary based on the configuration of your system.
Standard Attribute | Description |
|---|---|
Last Name | Defines the last name of the contact. The maximum length is 50 characters. |
First Name | Defines the first name of the contact. The maximum length is 50 characters. |
Preferred Name | Defines the preferred name of the contact. The maximum length is 50 characters. |
Postal Code | Defines the postal code of the contact. The maximum length is 10 characters. |
Country | Defines the country of the contact. This setting influences which language the system uses for system messages to the contact. |
Language | Defines the preferred language of the contact. This setting influences which language the system uses for system messages to the contact. |
Time Zone | Defines the time zone of the contact. |
Title | Defines the gender of the contact. The system saves your selection as a number. Some code sections require a numerical value to reuse the information.
|
Date of Birth | Defines the date of birth of the contact. Enter the date in YYYY-MM-DD format. Click the |
Source ID | Shows the ID of the source of the contact. This attribute lets you track contacts generated by an internal or external source. This ID is added to the contact profile during a data import. You cannot edit the source ID manually. |
Apply | Enters the updated attribute information and collapses the attribute card. To save your changes, you must click Save in the header of the Contact Profile window. |
Cancel | Discards your changes and collapses the attribute card. |
Channels
Adds attributes that are available for the selected channel to the attributes that are shown in the attribute card.
You can assign attributes to different channels. For example, if you want to filter for an attribute that contains the last activation of an App in a certain channel. The channel is the App that the user installed.
It is also possible to create attributes that are available to all channels. These generic attributes contain the same value no matter in what channel they are used. For example, the gender attribute stays the same, independent from channel context.
To select or deselect a channel, click the checkbox. Selected items are indicated with the ![]() symbol.
symbol.
| Channels filter | Description |
|---|---|
| All | Shows attributes that are available in all current and future channels. This option includes standard attributes and custom or member attributes that are available for all channels. |
| Any | Shows attributes that are assigned to a channel, regardless of which channel. |
| Specific | Shows attributes that are assigned to a specific channel currently. Every system has at least one specific channel. The system lists each channel that is available on your system by name. There is no limit to how many specific channels your system can contain. |
Member Attributes
This card adds the member attributes that are available for the selected group to the attributes shown in the attribute card.
A member attribute saves information for a contact in the context of a group. Member attributes let you save different information for the same contact in different groups. If you delete a group, the member attributes and the values that are stored for the group are deleted permanently. The information is not stored anywhere else in the system.
Create member attributes with an import of an XML or CSV file. If the referenced member attributes are not created, member attributes can be created when the message is composed.
You can access the profile of a contact form the Group Members window of a group or the All Contacts overview.
When you access a profile from the Group Members window, the system adds the member attributes of the group automatically.
When you access a profile from the All Contacts overview, you enter group names manually in the Member Attributes card.
Member attributes are only shown if the group has member attributes.
Name | Description |
|---|---|
Group | Enter the name of the desired group. The system adds all available member attributes of the selected group to the Attribute card. |
Channel Addresses tab
Activity tab
This tab shows all the activities that are stored in the system for the selected contact. These activities appear in chronological order, with the most recent activities at the top. In this window, you can filter the data by activity and time period.
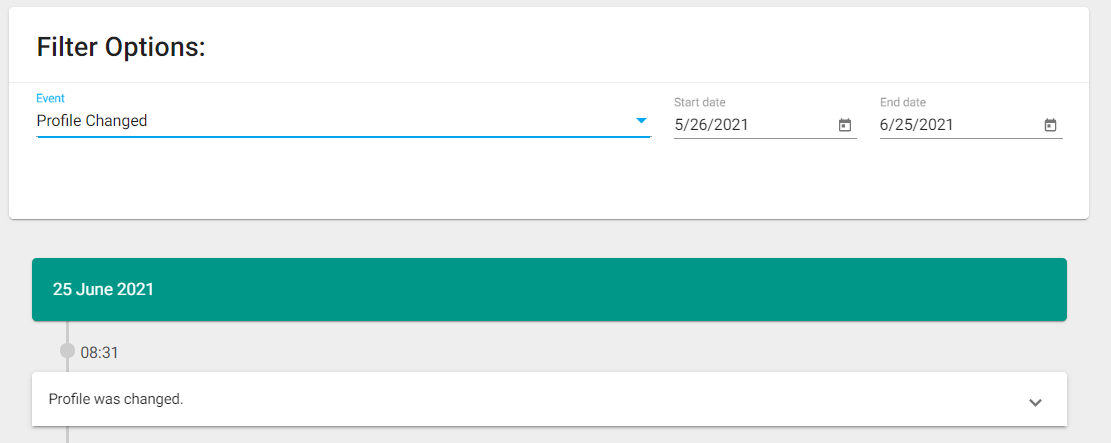
Filter Options
Here you can filter the activity feed to limit the results to specific events or a specific time frame.
Setting | Description |
|---|---|
Event |
|
Start date | To filter by time period, enter a start date in a numerical format by year-month-day. Alternatively, click the calendar symbol to select a start date. |
End date | To filter by time period, enter an end date in a numerical format by year-month-day. Alternatively, click the calendar symbol to select an end date. |