Query Parameter Tracking
If you have experience using the Mapp Intelligence API and Data Models, then query-based parameter tracking might be right for you. This method allows you to customize your tracking further by creating parameters and even query URLs on your own. If you would prefer a different approach, you can find more information about object-oriented tracking here.
Page Tracking is possible with both auto-tracking enabled and disabled. If auto-tracking is disabled, only the screens that are specifically marked for tracking with the given methods are tracked.
Parameter ConstantsParameter constants only work for query-based tracking. The following parameter constants are available for page tracking:
Parameter | Description | Where to configure (Mapp Q3 > Configuration > ...) | Where to analyze |
|---|---|---|---|
| PAGE_CATEGORY | Page categories (called "Content Groups" in Mapp) are used to group pages to create website areas. | Categories > Content Groups > New Category | Datatype Text: Navigation > Content groups > [Name of Content group] Datatype Figure: metric |
PAGE_PARAM | You can use parameters to enrich Analytics data with your own website-specific information and/or metrics. | Custom Parameters > Page Parameters > Create new Custom Parameter > Preconfigured > Own Configuration | Datatype Text: Navigation > Page Parameters > [Name of Parameter] Datatype Figure: metric |
INTERNAL_SEARCH | Is used to track an internal search request in Intelligence. | - | Marketing > Search Phrases > Internal Search Phrases |
Methods
Method | Description |
|---|---|
trackPage( context: Context, ) | Used for page tracking when you want to specify the context to be tracked as well. You can define a page name in "customPageName" and add a page parameter in "trackingParams" both these parameters are optional on kotlin. |
trackCustomPage( pageName: String, ) | Used for page tracking without specifying the context. You can define a page name in "pageName" and add an optional page parameter in "trackingParams". |
trackPage() and trackCustomPage() always create a new content ID. So if you use this parallel to automatic tracking, you create two content IDs for one page and thus two-page impressions. These methods should therefore not be used to overwrite the automatically generated content ID. Please use @ TrackPageDetail instead or disable auto-tracking for the specific screen with annotation @ StopTrack on class (Activity or Fragment) or globally in Global Configuration .
Example
Please note that custom parameters are optional in the request.
First, define your custom parameters (names/ keys) as extension properties of
Param.
For example, if this parameter has a key in the server with the name "cg1" or "cp10", you can define it this way in your app:val NEW_CATEGORY inline get() = customParam(ParamType.PAGE_CATEGORY, 1 ) //this will equal cg1 val NEW_PAGEPARAM inline get() = customParam(ParamType.PAGE_PARAM, 10 ) //this will equal cp10CODEFor consistency and code convention, check out the corresponding name in the server.
Add the custom parameters to the
TrackingParams()object, which is a map of the names of the custom parameters (keys) and their values (that are tracked).val pageParams = TrackingParams() pageParams.putAll( mapOf( Param.NEW_CATEGORY to "category value 1" , Param.NEW_PAGEPARAM to "parameter value 10" , Param.INTERNAL_SEARCH to "search phrase" ) )CODESend your
TrackingParams()object to Mapp Intelligence.// Use trackCustomPage() Webtrekk.getInstance().trackCustomPage( "page name" , pageParams) // Use trackPage() Webtrekk.getInstance().trackPage( this , "page name" , pageParams)CODE
Full Code Example:
class AppActivity : AppCompatActivity() {
val NEW_CATEGORY
inline get() = customParam(ParamType.PAGE_CATEGORY, 1 )
val NEW_PAGEPARAM
inline get() = customParam(ParamType.PAGE_PARAM, 10 )
override fun onCreate(savedInstanceState: Bundle?) {
super .onCreate(savedInstanceState)
setContentView(R.layout.activity_details)
val trackingParams = TrackingParams()
trackingParams.putAll(
mapOf(
Param.NEW_CATEGORY to "category value 1" ,
Param.NEW_PAGEPARAM to "parameter value 10" ,
Param.INTERNAL_SEARCH to "search phrase"
)
)
// Use trackCustomPage()
Webtrekk.getInstance().trackCustomPage( "page name" , pageParams)

// Use trackPage()
Webtrekk.getInstance().trackPage( this , "page name" , pageParams)
}
}First, define your custom parameters (names/ keys) as extension properties of
Param.
For example, if this parameter has a key in the server with the name "cg1" or "cp10", you can define it this way in your app:private static final String NEW_CATEGORY = createCustomParam(ParamType.PAGE_CATEGORY, 1 ); //This will equal cg1 private static final String NEW_PAGEPARAM = createCustomParam(ParamType.PAGE_PARAM, 10 ); //This will equal cp10JAVAFor consistency and code convention, check out the corresponding name in the server.
Add the custom parameters to the
TrackingParams()object, which is a map of the names of the custom parameters (keys) and their values (that are tracked).Map<String, String> pageParams = new LinkedHashMap<>(); pageParams.put(BACKGROUND_PARAM, "blue" ); pageParams.put(NEW_CATEGORY, "category value 1" ); pageParams.put(NEW_PAGEPARAM, "page param value 1" );JAVASend your
TrackingParams()object to Mapp.// Use trackCustomPage() Webtrekk.getInstance().trackCustomPage( "page name" , pageParams) // Use trackPage() Webtrekk.getInstance().trackPage( this , "page name" , pageParams)JAVA
Full Code Example:
public class AppActivity extends AppCompatActivity {
private static final String NEW_CATEGORY = createCustomParam(ParamType.PAGE_CATEGORY, 1 ); //This will equal cg1
private static final String NEW_PAGEPARAM = createCustomParam(ParamType.PAGE_PARAM, 10 ); //This will equal cp10
@Override
protected void onCreate(Bundle savedInstanceState) {
super .onCreate(savedInstanceState);
setContentView(R.layout.activity_main);
Map<String, String> pageParams = new LinkedHashMap<>();
     pageParams.put(BACKGROUND_PARAM, "blue" );
     pageParams.put(NEW_CATEGORY, "category value 1" );
     pageParams.put(NEW_PAGEPARAM, "page param value 1" );
//Use trackCustomPage
Webtrekk.getInstance().trackCustomPage( "custom page name" , pageParams);
//Use trackPage()
Webtrekk.getInstance().trackPage( this , "custome page name" , pageParams);
}
}Custom Page Parameters
The following custom page parameters are predefined and are only used for page tracking:
- PAGE_PARAM("cp")
- PAGE_CATEGORY("cg")
If you are using the custom page parameters listed above for event tracking, their values will be ignored in Intelligence.
The following custom parameters can be used for both, page and event tracking:
- CAMPAIGN_PARAM("cc")
- SESSION_PARAM("cs")
- URM_CATEGORY("uc")
- ECOMMERCE_PARAM("cb")
- PRODUCT_CATEGORY("ca")
You will also find detailed information about page parameters in our Pixel References: Page Parameters.
Event or action tracking is possible with both auto-tracking enabled or disabled. Measured actions are listed in the tool under Navigation > Events.
You can also track custom events. The tracking of custom events is possible while automatic tracking is enabled because trackCustomEvent() is not taking the activity/ fragment context.
Parameter constants only work for query-based tracking.
Parameter | Description | Where to configure (Mapp Q3 > Configuration > ...) | Where to Analyze |
|---|---|---|---|
| EVENT_PARAM | Adds additional parameters to an event to further describe an Event | Categories > Custom Parameters > Event Parameter | Datatype Text: Navigation > Event Parameter > [Name of parameter] Datatype Figure: metric |
If you are using the custom event parameter listed above for page tracking, their values will be ignored in Analytics.
Methods
Method | Description |
|---|---|
trackCustomEvent( eventName: String, ) | Used to track events in Intelligence when query parameter tracking is used. This option requires good knowledge of the Mapp Intelligence data model. An event name must always be given, tracking parameters are optional. |
Example
Please note that custom parameters are optional in the request.
First, define your custom parameters (names/ keys) as extension properties of
Param.
For example, if this parameter has a key in the server with the name "ck1", you can define it this way in your app:val Param.NEW_EVENTPARAM inline get() = customParam(ParamType.EVENT_PARAM, 1 ) // This will be equal to "ck1"JAVA
For consistency and code convention, check out the corresponding name in the server.
Add the custom parameters to the
TrackingParamsobject, which is a map of the names of the custom parameters (keys) and their values (that are tracked).val eventParams = TrackingParams() eventParams.putAll( mapOf( Param.NEW_EVENTPARAM to "event parameter value 1" ) )JAVASend the mapping object to Intelligence:
Webtrekk.getInstance().trackCustomEvent(eventName = "your event name" , trackingParams = eventParams)JAVA
Full code example
class AppActivity : AppCompatActivity() {

     val Param.NEW_EVENTPARAM
         inline get() = customParam(ParamType.EVENT_PARAM, 1 )

     val eventParams = TrackingParams()

     override fun onCreate(savedInstanceState: Bundle?) {
         super .onCreate(savedInstanceState)
         setContentView(R.layout.activity_main)

         eventParams.putAll(
             mapOf(
                 Param.NEW_EVENTPARAM to "event parameter value 1"
            )
         )

         startNewActivity.setOnClickListener {
             val intent = Intent( this , NewActivity:: class .java)

             //With custom event parameters
             Webtrekk.getInstance().trackCustomEvent(eventName = "your event name" , trackingParams = eventParams)

             //Without custom event parameters
             Webtrekk.getInstance().trackCustomEvent(eventName = "your event name" )

             startActivity(intent)
         }
     }
}First, define your custom parameters (names/ keys) as extension properties of
Param.
For example, if this parameter has a key in the server with the name "ck1", you can define it this way in your app:private static final String NEW_EVENTPARAM = createCustomParam(ParamType.EVENT_PARAM, 1 ); //This will be equal to ck1JAVA
For consistency and code convention, check out the corresponding name in the server.
Build a map and assign your parameters (names/ keys) to the values:
Map<String, String> eventParams = new LinkedHashMap<>(); eventParams.put(NEW_EVENTPARAM, "event parameter value 1" )JAVASend the mapping object to Intelligence:
Webtrekk.getInstance().trackCustomEvent( "your event name" ,eventParams);JAVA
Full code example
public class MainActivity extends AppCompatActivity {

     private static final String NEW_EVENTPARAM = createCustomParam(ParamType.EVENT_PARAM, 1 ); //This will equal ck1

     @Override
     protected void onCreate(Bundle savedInstanceState) {
         super .onCreate(savedInstanceState);
         setContentView(R.layout.activity_main);

     public void goToNewActivity(){
         Intent intent = new Intent( this , NewActivity. class );

         Map<String, String> eventParams = new LinkedHashMap<>();
         eventParams.put(NEW_EVENTPARAM, "event parameter value 1" );

         //With custom event parameters
         Webtrekk.getInstance().trackCustomEvent( "your event name" , eventParams);

         //Without custom event parameters
         Webtrekk.getInstance().trackCustomEvent( "your event name" , Collections.emptyMap());
         startActivity(intent);
     }
}Custom Event Parameters
The custom event parameter can only be used for event tracking:
- EVENT_PARAM("ck")
The following custom parameters can be used for both, page and event tracking:
- CAMPAIGN_PARAM("cc")
- SESSION_PARAM("cs")
- URM_CATEGORY("uc")
- ECOMMERCE_PARAM("cb")
- PRODUCT_CATEGORY("ca")
You can also find detailed information about event parameters in our Pixel References: Event Parameters.
In Mapp Intelligence you can analyze in detail which products in your app are viewed, placed in the shopping cart, and bought. Aggregated evaluations are possible across product categories. Intelligence automatically derives abandoned shopping carts from the information transmitted. Comprehensive information must be provided on the underlying order for product purchases, e.g. a unique order number.
Like orders, any additional information can be added to products using e-commerce parameters.
Parameter ConstantsParameter constants only work for query-based tracking. Predefined eCommerce parameters are defined in the ECommerceParam class, custom parameters can be created using the ParamType class.
| Parameter | Description | Where to configure (Mapp Q3 > Configuration > ...) | Where to analyze |
|---|---|---|---|
| ECOMMERCE_PARAM | Used to add additional information to a product or order using parameters. | Custom Parameters > E-Commerce Parameter | Datatype Text: E-Commerce > [] Datatype Figure: metric |
| PRODUCT_CATEGORY | Predefined parameter. Used to group products. Product categories allow the grouping of products. The relationship between product and product category must be unique. | Categories > Product Categories | |
| PRODUCT_NAME | Predefined parameter. Name of the product to be tracked. Multiple products need to be separated by a semicolon. A product name cannot exceed 110 characters. | - | |
PRODUCT_COST | Predefined parameter. Contains the product price ("0" values are allowed). If you transmit a product several times (quantity parameter PRODUCT_QUANTITY greater than 1), use the total price and not the unit price. If several prices are transmitted, they are each separated by a semicolon. | - | |
PRODUCT_CURRENCY | Predefined parameter. Contains the currency code of a product or order; the value must be passed to Intelligence in line with the ISO standard. If multiple products are transmitted on a single screen (e.g. on the order confirmation page if more than one product was purchased), only one currency will be applied to all products. This means that the value only needs to be set once. Note: The currency is only passed for currency conversion. In other words, the currency will be converted to the one (if any) that is stored in Mapp Q3 (Configuration > System configuration > Data Collection). Only one currency is ever displayed here. | - | |
| PRODUCT_QUANTITY | Predefined parameter. Contains the product quantity. If several products are transmitted, they are each separated by a semicolon. | - | |
| STATUS_OF_SHOPPING_CARD | Predefined parameter. Contains the shopping cart status. There are three possible values for the parameter:
| - | |
| ORDER_ID | Predefined parameter. Contains a unique order number (order ID). The use of this setting ensures that no orders are counted twice. | - | |
| ORDER_VALUE | Predefined parameter. Contains the total order value. | - | |
| CANCELLATION_VALUE | Predefined parameter | - | |
| PRODUCT_SOLD_OUT | Predefined parameter. Possible values:
| - | |
| RETURNING_OR_NEW_CUSTOMER | Predefined parameter. Figure. | Custom Parameters > E-Commerce Parameter > Preconfigured | |
| RETURN_VALUE | Predefined parameter. Figure. | Custom Parameters > E-Commerce Parameter > Preconfigured | |
| COUPON_VALUE | Predefined parameter. Figure. | Custom Parameters > E-Commerce Parameter > Preconfigured | |
| PRODUCT_ADVERTISE_ID | Predefined parameter. Figure. | Custom Parameters > E-Commerce Parameter > Preconfigured | |
| PAYMENT_METHOD | Predefined parameter. String. | Custom Parameters > E-Commerce Parameter > Preconfigured | |
| SHIPPING_SERVICE_PROVIDER | Predefined parameter. String. | Custom Parameters > E-Commerce Parameter > Preconfigured | |
| SHIPPING_SPEED | Predefined parameter. String. | Custom Parameters > E-Commerce Parameter > Preconfigured | |
| SHIPPING_COST | Predefined parameter. Figure. | Custom Parameters > E-Commerce Parameter > Preconfigured | |
| MARK_UP | Predefined parameter. Figure. | Custom Parameters > E-Commerce Parameter > Preconfigured | |
| ORDER_STATUS | Predefined parameter. String. | Custom Parameters > E-Commerce Parameter > Preconfigured | |
| PRODUCT_VARIANT | Predefined parameter. String. | Custom Parameters > E-Commerce Parameter > Preconfigured |
Example
- Define the parameters in your app:
val NEW_PRODUCT_CATEGORY inline get() = customParam(ParamType.PRODUCT_CATEGORY, 1) val NEW_ECOMMERCE_PARAM inline get() = customParam(ParamType.ECOMMERCE_PARAM, 1) val PRODUCT_SOLD_OUT inline get() = customParam(ParamType.ECOMMERCE_PARAM, 760) // Tracks if a product is sold out. Value must be 760 to use the correct pre-defined parameterJAVAprivate static final String NEW_PRODUCT_CATEGORY = createCustomParam(ParamType.PRODUCT_CATEGORY, 1); private static final String NEW_ECOMMERCE_PARAM = createCustomParam(ParamType.ECOMMERCE_PARAM, 1); private static final String PRODUCT_SOLD_OUT = createCustomParam(ParamType.ECOMMERCE_PARAM, 760); // Tracks if a product is sold out. Value must be 760 to use the correct pre-defined parameterJAVA Track the desired products as viewed in your app:
val productParams: MutableMap<String, String> = LinkedHashMap() productParams[PRODUCT_NAME] = "productId" productParams[STATUS_OF_SHOPPING_CARD] = "view" productParams[PRODUCT_COST] = "product cost" productParams[PRODUCT_CURRENCY] = "gbp" productParams[NEW_PRODUCT_CATEGORY] = "category productID" productParams[NEW_ECOMMERCE_PARAM] = "ecommerce param productID" productParams[PRODUCT_QUANTITY] = "quantity of product" productParams[PRODUCT_SOLD_OUT] = "1" //1 = product sold out, 0 = product available Webtrekk.getInstance().trackCustomPage("page name", productParams)JAVAMap<String, String> productParams = new LinkedHashMap<>(); productParams.put(PRODUCT_NAME, "productId"); productParams.put(STATUS_OF_SHOPPING_CARD, "view"); productParams.put(PRODUCT_COST, "product cost"); productParams.put(Param.PRODUCT_CURRENCY, "gbp"); productParams.put(NEW_PRODUCT_CATEGORY, "category productID"); productParams.put(NEW_ECOMMERCE_PARAM, "ecommerce param productID"); productParams.put(PRODUCT_QUANTITY, "quantity of product"); productParams.put(PRODUCT_SOLD_OUT, "1"); //1 = product sold out, 0 = product available Webtrekk.getInstance().trackCustomPage("page name", productParams);JAVATrack add to cart status by changing STATUS_OF_SHOPPING_CARD to "add":
val productParams: MutableMap<String, String> = LinkedHashMap() productParams[PRODUCT_NAME] = "productId" productParams[STATUS_OF_SHOPPING_CARD] = "add" productParams[PRODUCT_COST] = "product cost" productParams[PRODUCT_CURRENCY] = "gbp" productParams[NEW_PRODUCT_CATEGORY] = "category productID" productParams[NEW_ECOMMERCE_PARAM] = "ecommerce param productID" productParams[PRODUCT_QUANTITY] = "quantity of product" Webtrekk.getInstance().trackCustomPage("page name", productParams)JAVAMap<String, String> productParams = new LinkedHashMap<>(); productParams.put(PRODUCT_NAME, "productID"); productParams.put(STATUS_OF_SHOPPING_CARD, "add"); productParams.put(PRODUCT_COST, "product cost"); productParams.put(Param.PRODUCT_CURRENCY, "gbp"); productParams.put(NEW_PRODUCT_CATEGORY, "category productID"); productParams.put(NEW_ECOMMERCE_PARAM, "ecommerce param productID"); productParams.put(PRODUCT_QUANTITY, "quantity of product"); Webtrekk.getInstance().trackCustomPage("page name", productParams);JAVA- Track order confirmation by changing STATUS_OF_SHOPPING_CARD to "conf" and add order information:
val productParams: MutableMap<String, String> = LinkedHashMap() productParams[PRODUCT_NAME] = "productId1;productId2;productIdN" productParams[STATUS_OF_SHOPPING_CARD] = "conf" productParams[PRODUCT_COST] = "cost productID1; cost productId2; cost productIdN" productParams[PRODUCT_CURRENCY] = "gbp" productParams[NEW_PRODUCT_CATEGORY] = "category productId1;;category productIdN" productParams[NEW_ECOMMERCE_PARAM] = "ecommerce param productId1;ecommerce productId2;" productParams[PRODUCT_QUANTITY] = "number productId1;number productId2;number productIdN" productParams[PRODUCT_SOLD_OUT] = "1" //1 = product sold out, 0 = product available productParams[ORDER_ID] = "order ID" productParams[ORDER_VALUE] = "total order value" Webtrekk.getInstance().trackCustomPage("order conf pagename", productParams)JAVAMap<String, String> productParams = new LinkedHashMap<>(); productParams.put(PRODUCT_NAME, "productId1;productId2;productIdN"); productParams.put(STATUS_OF_SHOPPING_CARD, "conf"); productParams.put(PRODUCT_COST, "cost productId1; cost productId2; cost productIdN"); productParams.put(Param.PRODUCT_CURRENCY, "gbp"); productParams.put(NEW_PRODUCT_CATEGORY, "category productId1;;category productIdN"); productParams.put(NEW_ECOMMERCE_PARAM, "ecommerce param productId1;ecommerce productId2;"); productParams.put(PRODUCT_QUANTITY, "number productId1;number productId2;number productIdN"); productParams.put(ORDER_ID, "your order ID"); productParams.put(ORDER_VALUE, "total order value"); Webtrekk.getInstance().trackCustomPage("order conf page name", productParams);JAVA
Please note that when adding multiple products to one order, you need to separate the values for each product via a semicolon (;) in the correct order to correctly analyze it in Intelligence.
When using website goals, all central goals are quickly available for analyzing and filtering. Furthermore, the calculation of the customer journey is based on website goals. Thus, you can analyze for each website goal, which campaigns participated in the goal achievement. Goals can be sent as page or event requests.
Learn more about how to define goals in Mapp Q3 here.
Further information about the analysis and use of website goals in Mapp Intelligence can be found in the training chapter Analysis of Goal Achievement .
Parameter ConstantsParameter constants only work for query-based tracking.
Parameter | Description | Where to Configure (Mapp Q3 > Configuration > ...) | Where to Analyze |
|---|---|---|---|
| ECOMMERCE_PARAM | Ensure that the e-commerce parameter is configured as a website goal in Mapp Q3! | Goal > New Goal (Please ensure you created the respective e-commerce parameter before) | Marketing > Website Goals |
Example
First, define your e-commerce parameters (names/ keys) as extension properties of
Param. Make sure that the parameters are configured as a website goal in your Mapp Q3 account!
For example, if this parameter has id "1", you can define it this way in your app:val Param.NEW_GOAL inline get() = customParam(ParamType.ECOMMERCE_PARAM, 1 ) //this will equal cb1JAVA
For consistency and code convention, check out the corresponding name in the server.Add the custom parameters to the
TrackingParams()object, which is a map of the names of the custom parameters (keys) and their values (that are tracked).val trackingParams = TrackingParams() trackingParams.putAll( mapOf( Param.NEW_GOAL to "goal value 1" ) )JAVASend your
TrackingParams()object to Mapp.// Track as page without context Webtrekk.getInstance().trackCustomPage( "page name" , trackingParams) // Track as page with context Webtrekk.getInstance().trackPage( this , "page name" , trackingParams) //Track as event Webtrekk.getInstance().trackCustomEvent(eventName = "your event name" , trackingParams = trackingParams)JAVA
Full Code Example
class AppActivity : AppCompatActivity() {
val Param.NEW_GOAL
inline get() = customParam(ParamType.ECOMMERCE_PARAM, 1 )
override fun onCreate(savedInstanceState: Bundle?) {
super .onCreate(savedInstanceState)
setContentView(R.layout.activity_details)
val trackingParams = TrackingParams()
trackingParams.putAll(
     mapOf(
         Param.NEW_GOAL to "goal value 1"
     )
)
// Track as page without context
Webtrekk.getInstance().trackCustomPage( "page name" , trackingParams)
// Track as page with context
Webtrekk.getInstance().trackPage( this , "page name" , trackingParams)
//Track as event
startNewActivity.setOnClickListener {
val intent = Intent( this , NewActivity:: class .java)
Webtrekk.getInstance().trackCustomEvent(eventName = "your event name" , trackingParams = trackingParams)
startActivity(intent)
}
}
}First, define your custom parameters (names/ keys) as extension properties of
Param. Make sure that the parameters are configured as a website goal in your Mapp Q3 account!private static final String NEW_GOAL = createCustomParam(ParamType.ECOMMERCE_PARAM, 1 , 1 ); //This will equal cb1CODE
For consistency and code convention, check out the corresponding name in the server.Add the custom parameters to the
TrackingParams()object, which is a map of the names of the custom parameters (keys) and their values (that are tracked).Map<String, String> trackingParams = new LinkedHashMap<>(); trackingParams.put(NEW_GOAL, "goal value 1" );CODESend your
TrackingParams()object to Intelligence.// Track as page request without context Webtrekk.getInstance().trackCustomPage( "page name" , trackingParams) // Track as page with context Webtrekk.getInstance().trackPage( this , "page name" , trackingParams) // Track as event Webtrekk.getInstance().trackCustomEvent( "your event name" , trackingParams)CODE
Full Code Example
public class AppActivity extends AppCompatActivity {
private static final String NEW_GOAL = createCustomParam(ParamType.ECOMMERCE_PARAM, 1 ); //This will equal cb1
@Override
protected void onCreate(Bundle savedInstanceState) {
super .onCreate(savedInstanceState);
setContentView(R.layout.activity_main);
Map<String, String> trackingParams = new LinkedHashMap<>();
     trackingParams.put(NEW_GOAL, "goal value 1" );
//Track as page without context
Webtrekk.getInstance().trackCustomPage( "custom page name" , trackingParams);
//Track as page with context
Webtrekk.getInstance().trackPage( this , "custome page name" , trackingParams);
//Track as event step1
Button button = findViewById(R.id.button);
button.setOnClickListener ( new View.OnClickListener(){
@Override
public void onClick(View v){
goToNextActivity();
}
});
//Track as event step2
public void goToNextActivity(){
Intent intent = new Intent( this , NextActivity. class );
Map<String, String> trackingParams = new LinkedHashMap<>();
trackingParams.put(NEW_GOAL, "goal value 1" );
Webtrekk.getInstance().trackCustomEvent( "your event name" , trackingParams);
startActivity(intent);
}
}
}In case you see errors, ensure that you imported the necessary libraries:
import webtrekk.android.sdk.ParamType;
import webtrekk.android.sdk.Webtrekk;
import static webtrekk.android.sdk.ParamTypeKt.createCustomParam;
Campaign tracking is configured in Mapp Q3 (Configuration > Marketing Configuration). Without this configuration, no campaign information will be collected.
Further information about campaigns can be found in the training chapter Campaign Configuration .
Campaigns can be tracked in both page and event requests.
Parameter ConstantsParameter constants only work for query-based tracking. Predefined campaign parameters are defined in the CampaignParam class, custom parameters can be created using the ParamType class.
Parameter | Description | Where to configure (Mapp Q3 > Configuration > ...) | Where to analyze |
|---|---|---|---|
| MEDIA_CODE | The media code is used to mark campaigns in Intelligence. | - | Marketing > Campaigns |
| CAMPAIGN_PARAM | Used to enrich campaigns with additional parameters. | Configuration > Custom Parameters > Campaign Parameter | Datatype Text: Marketing > Campaign Parameters Datatype Figure: metric |
For deep link campaigns, please check the dedicated use case description.
It is possible to enrich data to a particular session with additional parameters. Depending on the settings in your account, either the first or the last value of the parameter is taken into account for your analyses.
Session parameters can be tracked in both page and event requests.
Parameter ConstantsParameter constants are only available for query-based tracking.
Parameter | Description | Where to configure (Mapp Q3 > Configuration > ...) | Where to analyze |
|---|---|---|---|
| SESSION_PARAM | Used to enrich analyses of sessions with additional information. | Custom Parameters > Session Parameter | Datatype Text: Visitors > Session Parameters Datatype Figure: metric |
Pre-Defined Session Parameter
The prerequisite for tracking the default values (App version, App update, and App first open) is that you first create the necessary session parameters in Mapp Q3. Using pre-defined parameters, you do not need to create the parameters in your mobile application, but just need to activate them in Mapp Q3 instead. This section describes how to create the appropriate parameters.
The following parameters are pre-defined in the SDK:
Parameter | Parameter ID | Description | Data Type | Amount Parameter Values | Calculation |
|---|---|---|---|---|---|
| App updated | 815 | When the end-user updates the app to a new version, it is tracked via this predefined session parameter. | Figure | Single value | The last value wins. This means only the last value of the transmitted parameter is counted per session. |
| App version | 804 | This parameter analyzes whether users are utilizing the latest version of your app. | Text | Single value | The last value wins. This means only the last value of the transmitted parameter is counted per session. |
| App first open | 821 | This parameter is tracked when the user opens the app for the first time after installing the mobile application from the Web or App Store. | Text | Single value | First value wins. This means only the first value of the transmitted parameter is counted per session. |
To configure the session parameter, proceed as follows:
- Log in to your Mapp Q3 account.
- Go to Configuration > Custom Parameters > Session parameters
- Then click Create a new custom parameter. The specification dialog for the session parameter opens.
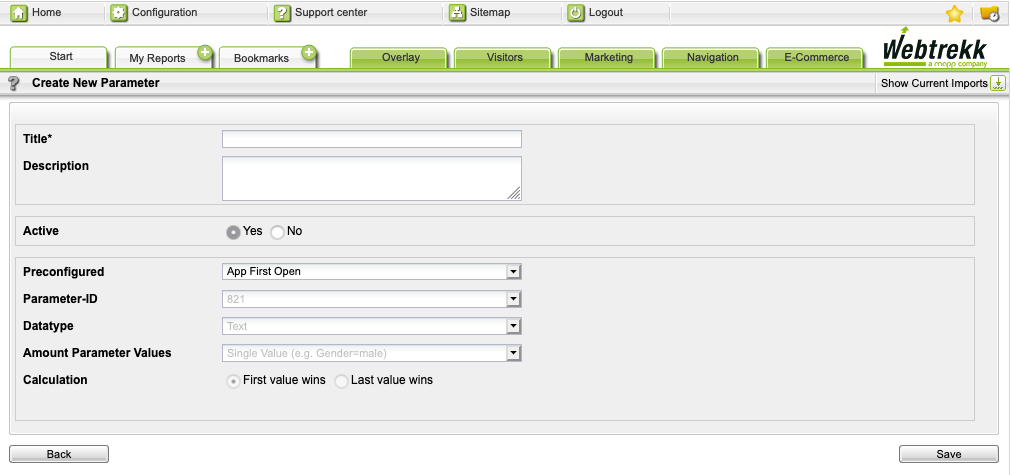
Make the following configuration:
Parameter
Description
Title Mandatory. Enter the name of the session parameter. Description Optional. Enter a description for the session parameter. Active Select via the radio button whether the session parameter is active or inactive. When disabled, no data is collected.
Preconfigured Under "Preconfigured," select one of the following parameters:
- App updated
- App version
- App first open
Preset settings apply automatically.
Parameter ID The ID is set automatically by the system. - Click Save to save your settings.
Identifying customers or users is important to improve the analysis of user behavior in your app, e.g. to identify returning visitors. It is also possible to further categorize customers to improve Intelligence results.
Customer data can be tracked in both page and event requests.
Parameter ConstantsParameter constants are only available for query-based tracking. Predefined customer parameters are defined in the UserCategoriesParam class, custom parameters can be created using the ParamType class. We highly recommend using MD5 or SHA hashes when transmitting user identifiable data to Mapp Intelligence via the SDK.
| Parameter | Description | Where to Configure (Mapp Q3 > Configuration > ...) | Where to Analyze |
| URM_CATEGORY | Used to specify custom user information to enrich customer information with additional data. | Categories > URM Categories > New Category | URM - User Relationship Management |
| CUSTOMER_ID | Predefined URM category. Used to uniquely identify a user. We highly recommend using MD5 or SHA methods if you pass e-mail addresses. | - | |
| FIRST_NAME | Predefined URM category | ||
| LAST_NAME | Predefined URM category | ||
CITY | Predefined URM category | ||
| COUNTRY | Predefined URM category | ||
| STREET | Predefined URM category | ||
| STREET_NUMBER | Predefined URM category. String in following requested: [ YYYMMDD ] | ||
| ZIP_CODE | Predefined URM category | ||
| GENDER | Predefined URM category. Possible values:
| ||
| BIRTHDAY | Predefined URM category | ||
| EMAIL_ADDRESS | Predefined URM category | ||
| PHONE_NUMBER | Predefined URM category | ||
| EMAIL_RECEIVER_ID | Predefined URM category | ||
| NEW_SELLER_SUBSCRIBED | Predefined URM category |
Form tracking is available in native Android applications as of SDK version 5.0.1.
Form tracking allows customers to get in-depth information of form input by users and indicates if a user filled out (filled out or value of the field) a particular form field or not (empty value).
Trackable Field TypesCurrently, the input of the following field types can be tracked:
- EditText
- Plain
- Multiline
- AutoComplete
- MultiAutoComplete
- Address
- Phone
- Password
- Number
- Time
- Date
- SearchView
- RadioButton
- ToggleButton
- Switch
- CheckBox
- RatingBar
- Spinner
Name of Function
formTracking(
        context: Context,
        view: View? = null,
        formTrackingSettings: FormTrackingSettings = FormTrackingSettings()
)| Attribute | Description | Mandatory |
|---|---|---|
| context | The context of the current activity. | yes |
| view | Overrides the local view used in the activity. | no |
| formTrackingSettings | Additional settings to customize form tracking | no |
Configuration
Set the form tracking configuration.
- formName: By default, the name of the current activity or view is used as the name of the form. Use this function to specify a different name for the form.
- fieldIds: If you want to track only specific fields of the form, indicate them here. Otherwise, all trackable fields of the current activity or view are tracked.
- renameFields: By default, the name of the field ID is used to generate the name of the field. If you want to change the default name you can specify this here.
- changeFieldsValue: By default, the value of the text field is used as the value of the field. You can change the default value here. Please be aware that if hardcoded, the field value is changed permanently and does not indicate anymore if a field was left empty.
- anonymousSpecificFields: By default, only EditText fields are anonymized and send as filled out or empty to the track server, instead of displaying the actual value of the field. If other field types need to be anonymized, you can indicate them here.
- fullContentSpecificFields: By default, the SDK sends EditText fields anonymized (filled out / empty) to Mapp Intelligence. If you want to send the actual content of the specific fields instead, indicate them here.
- confirmButton: If you want to indicate that a form has been submitted or canceled, you can set the confirmButton to true or false. By default, the confirmButton is set to true.
- anonymous: If you want to anonymize all field types, set anonymous to true.
- pathAnalysis: You can track the order in which the user has filled out the fields. Please note that you need to track the order manually and parse the data to the fieldsOrder function. Mapp Intelligence cannot track the order in which the user filled out the form automatically.
data class FormTrackingSettings(
    var formName: String = "",
    var fieldIds: List<Int> = emptyList(),
    var renameFields: Map<Int, String> = emptyMap(),
    var changeFieldsValue: Map<Int, String> = emptyMap(),
    var anonymousSpecificFields: List<Int> = emptyList(),
    var fullContentSpecificFields: List<Int> = emptyList(),
    var confirmButton: Boolean = true,
    var anonymous: Boolean = true,
    var pathAnalysis: List<Int> = emptyList()
)Example
// set form tracking config for confirmation and cancellation of form
class FormActivity : AppCompatActivity(), AdapterView.OnItemSelectedListener {
    override fun onCreate(savedInstanceState: Bundle?) {
        super.onCreate(savedInstanceState)
        setContentView(R.layout.form_main)

        //Set a listener on the cancel button of a form
        cancel.setOnClickListener {
            val form = FormTrackingSettings()
            form.confirmButton = false //confirm button is
            form.formName = "test123"
            form.anonymous = true
            form.anonymousSpecificFields = listOf(R.id.editText, R.id.editText3, R.id.switch1)
            form.fullContentSpecificFields = listOf(R.id.editText2)
            Webtrekk.getInstance().formTracking(this, formTrackingSettings = form)
        }

        //Set a listener on the confirm button of a form
        confirm.setOnClickListener {
            val form = FormTrackingSettings()
            form.confirmButton = true
            form.formName = "test123"
            form.anonymous = true
            form.anonymousSpecificFields = listOf(R.id.editText2)
            form.fullContentSpecificFields = listOf(R.id.editText, R.id.editText3, R.id.switch1)
            Webtrekk.getInstance().formTracking(this, formTrackingSettings = form)
        }
    }
}

// configure specific view
val view =
    findViewById<View>(android.R.id.content).rootView
Webtrekk.getInstance().formTracking(this,view=view)

// configure form name
val form= FormTrackingSettings()
form.formName="My Form"
Webtrekk.getInstance().formTracking(this,formTrackingSettings=form)

// congfigure to track only specific fields
val form= FormTrackingSettings()
form.fieldsOrder= listOf(R.id.editText2,R.id.editText)
Webtrekk.getInstance().formTracking(this,formTrackingSettings=form)

// rename fields
val form= FormTrackingSettings()
form.renameFields=mapOf(Pair(R.id.editText2,"Named text view"))
Webtrekk.getInstance().formTracking(this,formTrackingSettings=form)

// anonymise specific fields
val form= FormTrackingSettings()
form.anonymousSpecificFields=listOf(R.id.switch1)
Webtrekk.getInstance().formTracking(this,formTrackingSettings=form)

// anonymise all fields
val form= FormTrackingSettings()
form.anonymous=true
Webtrekk.getInstance().formTracking(this,formTrackingSettings=form)

// show full content of specific fields
val form= FormTrackingSettings()
form.fullContentSpecificFields=listOf(R.id.editText1)
Webtrekk.getInstance().formTracking(this,formTrackingSettings=form)

// change value of fields
val form= FormTrackingSettings()
form.changeFieldsValue=mapOf(Pair(R.id.editText2,"New value")) // this needs to be filled dynamically!
Webtrekk.getInstance().formTracking(this,formTrackingSettings=form)

// set confirm button to false
val form= FormTrackingSettings()
form.confirmButton=false
Webtrekk.getInstance().formTracking(this,formTrackingSettings=form)

// track path analysis
val form= FormTrackingSettings()
form.pathAnalysis= listOf(R.id.editText2,R.id.editText,R.id.editText3) //this needs to be filled dynamically!
Webtrekk.getInstance().formTracking(this,formTrackingSettings=form)// set form tracking config for confirmation and cancellation of form
public class FormActivity extends AppCompatActivity implements AdapterView.OnItemSelectedListener {
private Button cancel;
private Button confirm;
@Override
protected void onCreate(Bundle savedInstanceState) {
super.onCreate(savedInstanceState);
setContentView(R.layout.form_main);
//Set a listener on the cancel button of a field
cancel = findViewById(R.id.cancel);
cancel.setOnClickListener(new View.OnClickListener() {
@Override
public void onClick(View v) {
FormTrackingSettings form = new FormTrackingSettings();
form.setConfirmButton(false);
form.setFormName("test123");
form.setAnonymous(true);
form.setAnonymousSpecificFields(Arrays.asList(R.id.editText, R.id.editText3, R.id.switch1));
form.setFullContentSpecificFields(Arrays.asList(R.id.editText2));
Webtrekk.getInstance().formTracking(FormActivity.this, null, form);
}
});
//Set a listener to the confirm button of a field
confirm = findViewById(R.id.confirm);
confirm.setOnClickListener(new View.OnClickListener() {
@Override
public void onClick(View v) {
FormTrackingSettings form = new FormTrackingSettings();
form.setConfirmButton(true);
form.setFormName("test123");
form.setAnonymous(false);
form.setAnonymousSpecificFields(Arrays.asList(R.id.editText2));
form.setFullContentSpecificFields(Arrays.asList(R.id.editText, R.id.editText3, R.id.switch1));
Webtrekk.getInstance().formTracking(FormActivity.this, null, form);
}
});
}
}
// Configure specific view
View view = findViewById(android.R.id.content).getRootView();
Webtrekk.getInstance().formTracking(this, view, new FormTrackingSettings());
// Configure form name
FormTrackingSettings form = new FormTrackingSettings();
form.setFormName("My Form");
Webtrekk.getInstance().formTracking(this, null, formOne);
// Configure to track only specific fields
FormTrackingSettings form = new FormTrackingSettings();
form.setFieldIds(Arrays.asList(R.id.editText2, R.id.editText));
Webtrekk.getInstance().formTracking(this, null, formTwo);
// Rename fields
FormTrackingSettings form = new FormTrackingSettings();
form.setRenameFields(new LinkedHashMap<Integer, String>() {{
put(R.id.editText2, "Named text view");
}});
Webtrekk.getInstance().formTracking(this, null, formThree);
// Anonymize specific fields
FormTrackingSettings form = new FormTrackingSettings();
form.setAnonymousSpecificFields(Arrays.asList(R.id.switch1));
Webtrekk.getInstance().formTracking(this, null, formFour);
// Anonymize all fields
FormTrackingSettings form = new FormTrackingSettings();
form.setAnonymous(true);
Webtrekk.getInstance().formTracking(this, null, formFive);
// Show full content of specific fields
FormTrackingSettings form = new FormTrackingSettings();
form.setFullContentSpecificFields(Arrays.asList(R.id.editText));
Webtrekk.getInstance().formTracking(this, null, formSix);
// Change value of fields
FormTrackingSettings form = new FormTrackingSettings();
form.setChangeFieldsValue( new LinkedHashMap<Integer, String>() {{
put(R.id.editText2, "New Value");
}}); // this needs to be filled dynamically!
Webtrekk.getInstance().formTracking(this, null, formSeven);
// Set confirm button to false
FormTrackingSettings form = new FormTrackingSettings();
form.setConfirmButton(false);
Webtrekk.getInstance().formTracking(this, null, formEight);
// Track path analysis
FormTrackingSettings form = new FormTrackingSettings();
form.setPathAnalysis(Arrays.asList(R.id.editText2,R.id.editText,R.id.editText3)); //this needs to be filled dynamically!
Webtrekk.getInstance().formTracking(this, null, formNine);Additional Resources
Please also check our sample application inside our Android SDK v5 version to try out form tracking in a sample app. You can download the SDK in GitHub.
Known Limitations- Last Focus does not work faultlessly and only for editText types.
- pathAnalysis and rename fields do not work automatically.
You can use our media tracking API to track user behavior on your media files.
Parameter ConstantsParameter constants can only be used in query-based tracking.
Parameter | Description | Mandatory | Where to Configure (Mapp Q3 > Configuration > ...) | Where to Analyze |
|---|---|---|---|---|
| MEDIA_CATEGORY = "mg" | Media Categories | no | Categories > Media Categories > New Category | Datatype Text: Navigation > Media Categories > [Name of media category] Datatype Figure: metric |
MEDIA_NAME = "mi" | Video Name | yes | Navigation > Media > Media | |
| MEDIA_ACTION = "mk" | The current action of the Media Player. Possible values are:
| yes | - | Navigation > Media > Media Player Actions |
| MEDIA_POSITION = "mt1" | The current position of the media in seconds (required) | yes | - | Navigation > Media > Media Run Time |
| MEDIA_DURATION = "mt2" | Total play duration of the media in seconds (required) | yes | - | - |
| BANDWIDTH = "bw" | Bandwidth bits/seconds | no | - | Navigation > Media > Media Bandwidth |
| VOLUME = "vol" | Volume, number 0-255, 0 is minimal, 255 is maximal | no | - | Navigation > Media > Media Player Volume |
| MUTE = "mut" | (1=mute active, volume off, 0=mute not active, volume on) | no | - | Navigation > Media > Media Player Mute |
Methods
Method | Description |
|---|---|
trackMedia( | Media name is required and should be unique on each video. Tracking params contain all parameters, media, or custom. |
Example
Step
trackingParams.putAll( mapOf( MediaParam.MEDIA_DURATION to duration.toString(), MediaParam.MEDIA_POSITION to (currentPosition / 1000 ).toString(), MediaParam.MEDIA_ACTION to "init" ) ) Webtrekk.getInstance().trackMedia( "video name" , trackingParams)JAVAStep
trackingParams.putAll( mapOf( MediaParam.MEDIA_DURATION to duration.toString(), MediaParam.MEDIA_POSITION to (currentPosition / 1000 ).toString(), MediaParam.MEDIA_ACTION to "stop" ) ) Webtrekk.getInstance().trackMedia( "video name" , trackingParams)JAVAStep
trackingParams.putAll(
           mapOf(
               MediaParam.MEDIA_DURATION to duration.toString(),
               MediaParam.MEDIA_POSITION to (currentPosition / 1000 ).toString(),
               MediaParam.MEDIA_ACTION to "seek"
           )
       )
       Webtrekk.getInstance().trackMedia( "video name" , trackingParams)
JAVA
Full Code Example
constructor(context: Context?) : super (context) {
         initMediaFile()
     }

fun initMediaFile() {
         trackingParams.putAll(
             mapOf(
                 MediaParam.MEDIA_DURATION to duration.toString(),
                 MediaParam.MEDIA_POSITION to (currentPosition / 1000 ).toString(),
                 MediaParam.MEDIA_ACTION to "init"

             )
         )
      Webtrekk.getInstance().trackMedia( "video name" , trackingParams)
     }

     override fun pause() {
         super .pause()
         trackingParams.putAll(
             mapOf(
                 MediaParam.MEDIA_POSITION to (currentPosition / 1000 ).toString(),
                 MediaParam.MEDIA_ACTION to "pause"
             )
         )
         Webtrekk.getInstance().trackMedia( "video name" , trackingParams)
     }

     override fun start() {
         super .start()
         trackingParams.putAll(
             mapOf(
                 MediaParam.MEDIA_POSITION to (currentPosition / 1000 ).toString(),
                 MediaParam.MEDIA_ACTION to "play"
             )
         )
         Webtrekk.getInstance().trackMedia( "video name" , trackingParams)

     }

     override fun stopPlayback() {
         super .stopPlayback()
         trackingParams.putAll(
             mapOf(
                 MediaParam.MEDIA_POSITION to (currentPosition / 1000 ).toString(),
                 MediaParam.MEDIA_ACTION to "stop"
             )
         )
         Webtrekk.getInstance().trackMedia( "video name" , trackingParams)
     }

     override fun seekTo(msec: Int) {
         trackingParams.putAll(
             mapOf(
                 MediaParam.MEDIA_POSITION to (currentPosition / 1000 ).toString(),
                 MediaParam.MEDIA_ACTION to "seek"
             )
         )
         Webtrekk.getInstance().trackMedia( "video name" , trackingParams)
        super .seekTo(msec)
        trackingParams.putAll(
             mapOf(
                 MediaParam.MEDIA_POSITION to (currentPosition / 1000 ).toString(),
                 MediaParam.MEDIA_ACTION to "pause" // can be pause or play
             )
         )
         Webtrekk.getInstance().trackMedia( "video name" , trackingParams)
}Step
Map<String, String> trackingParams = new HashMap<>(); trackingParams.put(MediaParam.MEDIA_DURATION, String.valueOf(duration / 1000 )); trackingParams.put(MediaParam.MEDIA_POSITION, String.valueOf(currentPosition / 1000 )); trackingParams.put(MediaParam.MEDIA_ACTION, "init" ); Webtrekk.getInstance().trackMedia( "video name" , trackingParams);JAVAStep
Map<String, String> trackingParams = new HashMap<>(); trackingParams.put(MediaParam.MEDIA_DURATION, String.valueOf(duration / 1000 )); trackingParams.put(MediaParam.MEDIA_POSITION, String.valueOf(currentPosition / 1000 )); trackingParams.put(MediaParam.MEDIA_ACTION, "stop" ); Webtrekk.getInstance().trackMedia( "video name" , trackingParams);JAVAStep
Map<String, String> trackingParams = new HashMap<>();
   trackingParams.put(MediaParam.MEDIA_DURATION, String.valueOf(duration / 1000 ));
   trackingParams.put(MediaParam.MEDIA_POSITION, String.valueOf(currentPosition / 1000 ));
   trackingParams.put(MediaParam.MEDIA_ACTION, "seek" );
   Webtrekk.getInstance().trackMedia( "video name" , trackingParams);
CODE
Full Code Example
public TrackedVideoView( @Nullable Context context) {
     super (context);
     this .initMediaFile();
  }

  public void initMediaFile() {
    Map<String, String> trackingParams = new HashMap<>();
       trackingParams.put(MediaParam.MEDIA_DURATION, String.valueOf(duration / 1000 ));
       trackingParams.put(MediaParam.MEDIA_POSITION, String.valueOf(currentPosition / 1000 ));
       trackingParams.put(MediaParam.MEDIA_ACTION, "init" );
       Webtrekk.getInstance().trackMedia( "video name" , trackingParams);
   }
  @Override
  public void  pause() {
       super .pause()
       trackingParams.put(MediaParam.MEDIA_POSITION, String.valueOf(currentPosition / 1000 ));
       trackingParams.put(MediaParam.MEDIA_ACTION, "pause" );
       Webtrekk.getInstance().trackMedia( "video name" , trackingParams);
   }
   @Override
   public void  start() {
       super .start()
       trackingParams.put(MediaParam.MEDIA_POSITION, String.valueOf(currentPosition / 1000 ));
       trackingParams.put(MediaParam.MEDIA_ACTION, "play" );
       Webtrekk.getInstance().trackMedia( "video name" , trackingParams);

   }
@Override
public void  stopPlayback() {
       super .stopPlayback()
       trackingParams.put(MediaParam.MEDIA_POSITION, String.valueOf(currentPosition / 1000 ));
       trackingParams.put(MediaParam.MEDIA_ACTION, "stop" );
       Webtrekk.getInstance().trackMedia( "video name" , trackingParams);

   }
  @Override
  public void seekTo(msec: Int) {
       trackingParams.put(MediaParam.MEDIA_POSITION, String.valueOf(currentPosition / 1000 ));
       trackingParams.put(MediaParam.MEDIA_ACTION, "seek" );
       Webtrekk.getInstance().trackMedia( "video name" , trackingParams);
      super .seekTo(msec)
       trackingParams.put(MediaParam.MEDIA_POSITION, String.valueOf(currentPosition / 1000 ));
       trackingParams.put(MediaParam.MEDIA_ACTION, "pause" ); // can be pause or play
       Webtrekk.getInstance().trackMedia( "video name" , trackingParams);

   }
API Constraints Start a media session
The API expects an initial "play" or "init" call to start a media session. Without an init or play call, the session cannot start, and further interaction with the video is impossible.
SeekIf a seek action is sent, the position sent in the seek request needs to be the position at the start of the seek action. Additionally, after each seek request, either a play or pause request (depending on the status before starting to seek) needs to be sent, including the current position of the video.
ExamplesExample 1: A user is watching a video on the play and starts to seek 8 seconds into the video. The seek function forwards the user to the position at 20 seconds and continues playing from there. The order and values for the media action and media position need to be sent as follows:
- Send a request with media action set to play
- Send the seek request with the following values:
- mk="seek"
- mt1="8"
- Once at the position after seek, send a play request with the following values:
- mk="play"
- mt1=20
Please note that Exo2Player changes a state to pause automatically after each seeks. You need to manually suppress that to be aligned with the API expectation.
Example 2: The user stops the video at 8 seconds into the video. The user starts to seek the same position. The seek function forwards the user to the position at 20 seconds and is still on pause at the end of seeking. The order and values for the media action and media position need to be sent as follows:
- Send a request with a media action set to pause.
- Send the seek request with the following values:
- mk="seek"
- mt1="8"
- Once at the position after seek, send a pause request with the following values:
- mk="pause"
- mt1=20