Test Multiple Email Message Variants (A/B Test)
Goal
To compare the performance of several variants of an email message with a split sendout.
This process has two steps:
- Create a Split Sendout
- Review Test Messages and Schedule Sendout
You can only use one sendout channel per split sendout. It is not possible to compare variants of an email message with variants of a push notification or SMS in the same split sendout.
Prerequisite
Create the different variants of the email message that you want to test.
Save each of the variants as a draft. For more information, see Draft Messages Overview (window).
Background Information
In a split sendout, you create two or more variants of a message. Each variant is sent to a different subset of the group to determine which message performs the best.
A split sendout makes it possible to compare the effect that different content has on the performance of your email message.
A split sendout can test up to ten email message variants simultaneously. For more information, see Split Sendouts.
Procedure
Create a Split Sendout
- In the Main Navigation, click Messages > Draft Messages > Email.
⇒ The Draft Messages Overview window opens. - Select two or more email messages for the split sendout. To select an email message, select the check box next to the message on the overview window.
- Click the Split Sendout button that is at the bottom of the overview window.
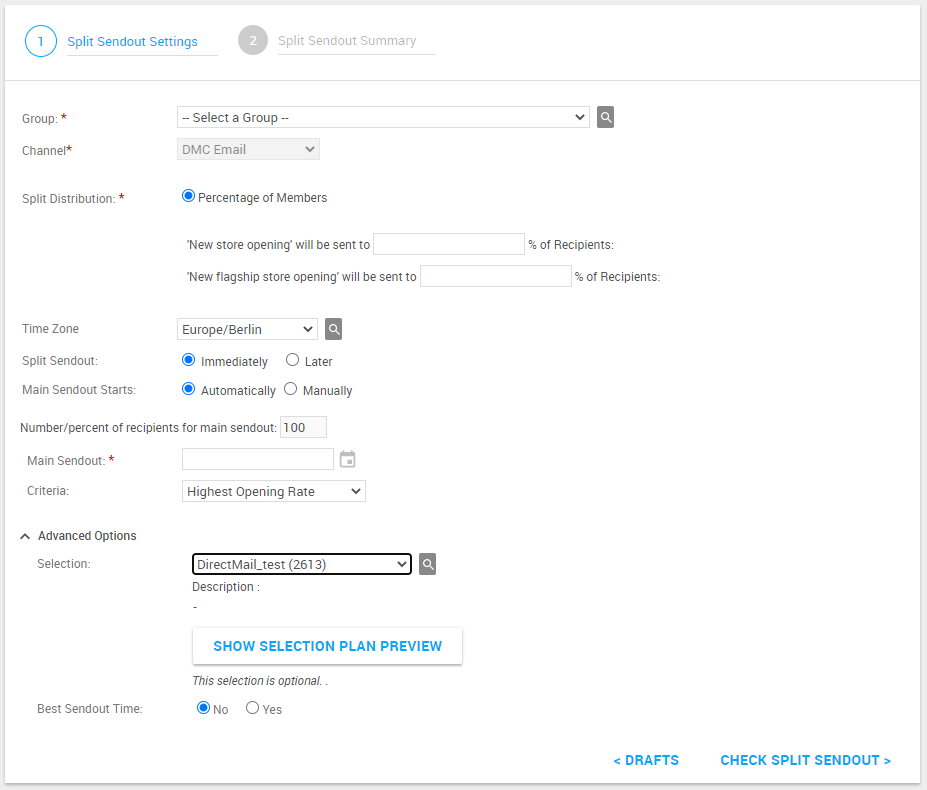
⇒ The Split Sendout Settings window opens. - From the Group drop-down list, select the group for the split sendout.
In the Split Distribution area, define how the split sendout is distributed in the group. Each group member only receives one variant of the email message per split sendout.
Percentage: Sends each variant of the email message to a specific percentage of group members.
If you apply a selection to the split sendout, the split distribution must be defined as a percent.
When you apply a selection and a percentage, Mapp Engage first determines which group members satisfy the selection criteria. Next, Mapp Engage randomly selects the specified percentage of contacts from the group members who met the selection criteria.Number: Sends each variant of the email message to a specific number of group members.
- From the Time Zone drop-down list, select the time zone for the split sendout.
In the Split Sendout area, select when the split sendout takes place.
Immediately: Starts the split sendout when you click the Send Message button in the next step.
Schedule: Starts the split sendout at a specific date and time. To schedule the sendout, click the calendar symbol.
⇒ All variations are sent at the same time. You can also define the sendout time for group messages in the group settings. If the start times are different, Mapp Engage delays the sendout until the start time defined in the group settings. For more information, see Sendout Options (tab).
In the Main Sendout Starts area, define how sendout to the remaining group members starts.
Automatically: Mapp Engage sends the most successful message variant from the split sendout to the remaining group members automatically. The remaining group members are the contacts who did not receive a message variant in the test sendouts. To give recipients enough time to interact with the test messages, the main sendout must be at least 24 hours after the split sendout.
In the Main Sendout: input field, select the date and time that the most successful message is sent to the remaining group members.
In the Criteria input field, select how Mapp Engage determines which message variant has the highest success rate. For information, see Split Sendout Settings (window).
Manually: None of the message variants are sent automatically to the main group. Based on the statistics for each variant, you select the variant that you want to send to the rest of the group. After you select a variant, you can start the main sendout immediately or at a scheduled time. For more information, see Manually Start Main Sendout.
In the Advanced Options area, apply more limitations to the split sendout. All settings in this area are optional.
Selection: Limits the split sendout to a defined subset of the group. If a main sendout is scheduled, the selection also applies to the main sendout.
- Show selection plan preview: The button appears once you chose a selection from the drop-down list. When you click on it, a window will pop-up with the following information:
- name of the selection,
- number of contacts in the selection,
- the date when it was last calculated,
- a summary of selection criteria.
Best sendout time: This is based on the number of opens and clicks performed by your contacts. For more information see, Best Sendout Time.
Review Test Messages and Schedule Sendout
- To review the split messages for the final sendout, click the Check Split Message button.
⇒ The Split Sendout Summary window opens. - From the Split Message drop-down list, select which message is displayed as a preview.
- To adjust the sendout settings, click the Split Settings button.
- To start the split sendout, click Send Message.
⇒ The split sendout is sent immediately or performed at the specified date and time.