Implementing the Marketing Automation Plugin
In this section, we describe the steps to integrate the Marketing Automation plugin based on the used pixel integration.
Implementation Methods
This is an optional feature. Please speak with your Customer Success or Account Manager for more information.
Functions
There are two types of functions that you can use to get your visitor's attention and
- On-site recommendations are great for updates or special offers based on user behavior.
- Exit-intent technology should be used to display a layer with discounts, shipping offers, or reminders when a user intends to exit a purchase process or page.
You can find more information on Marketing Automation in our training chapter.
Methods and properties
name
Get the name of the extension.
/**
 * @type {string}
 */
wtSmart.extension.marketing_automation.name;version
Get the version of the extension.
/**
 * @type {string}
 */
wtSmart.extension.marketing_automation.version;config
Set and get the current configuration of the extension.
- trackId: Mapp Intelligence uses the tracking ID to assign the server requests to an account. The tracking ID is also found in the system configuration of the Mapp Q3 tool under Configuration > System Configuration > Account. Please use the same tracking ID you stored in the Mapp Intelligence tracking code, regardless of the ID you used to configure Marketing Automation.
- mediacode: This is where you enter all of the campaign tracking media code parameters that you use.
- keyword: This is where you enter all of the campaign tracking keyword parameters that you use.
- baseUrl: Defined the location to the Mapp Marketing Automation functionality JavaScript file. Default value is "//cdn.mateti.net/mcp/onsite.min.js".
Please contact our Support or your responsible Customer Success Manager for activation if you prefer to fetch this library using your first-party Custom Track Domain (C-Name) for better data quality and quantity and to avoid Content Security Policy issues. - widgetServiceUrl: Defined the location to the Mapp Marketing Automation server configuration. Default value is "//[Trackdomain]/[TrackId]/rdfs".
Please contact our Support or your responsible Customer Success Manager for activation if you prefer to fetch this library using your first-party Custom Track Domain (C-Name) for better data quality and quantity and to avoid Content Security Policy issues.
/**
 * @param {{
 *      [trackId=current trackId]: string,
 *      [mediacode=[wt_mc,wtmc,mc]]: string[],
 *      [keyword=[wt_kw,wtkw,kw]]: string[],
 *      [baseUrl="//cdn.mateti.net/mcp/onsite.min.js"]: string,
 *      [widgetServiceUrl=""]: string
 * }} [config]
 *
 * @returns {object}
 */
wtSmart.extension.marketing_automation.config(config);isActivated
Get the status if the extension is enabled.
/**
 * @returns {boolean}
 */
wtSmart.extension.marketing_automation.isActivated();activate
Activate the extension.
/**
 * @returns {boolean}
 */
wtSmart.extension.marketing_automation.activate();deactivate
Deactivate the extension.
/**
 * @returns {boolean}
 */
wtSmart.extension.marketing_automation.deactivate();Example
// is marketing automation activated
var isActivated = wtSmart.extension.marketing_automation.isActivated();

// set marketing automation config
wtSmart.extension.marketing_automation.config({
    trackId: '111111111111111',
    mediacode: ['wt_mc', 'wtmc', 'mc'],
    keyword: ['wt_kw', 'wtkw', 'kw'],
    baseUrl: '//cdn.mateti.net/mcp/onsite.min.js',
    widgetServiceUrl: '//data.mapp.com/111111111111111/rdfs'
});

// activate marketing automation
wtSmart.extension.marketing_automation.activate();

// deactivate marketing automation
wtSmart.extension.marketing_automation.deactivate();Related
Getting Started: Marketing Automation Overview
User Interface of Marketing Automation
- Open the container to which you want to add the Marketing Automation plugin.
- Click [Add plugin]. You will be forwarded to the overview of all available plugins.

Select the "Marketing Automation" plugin by clicking on the corresponding button. The plugin configuration dialog opens.
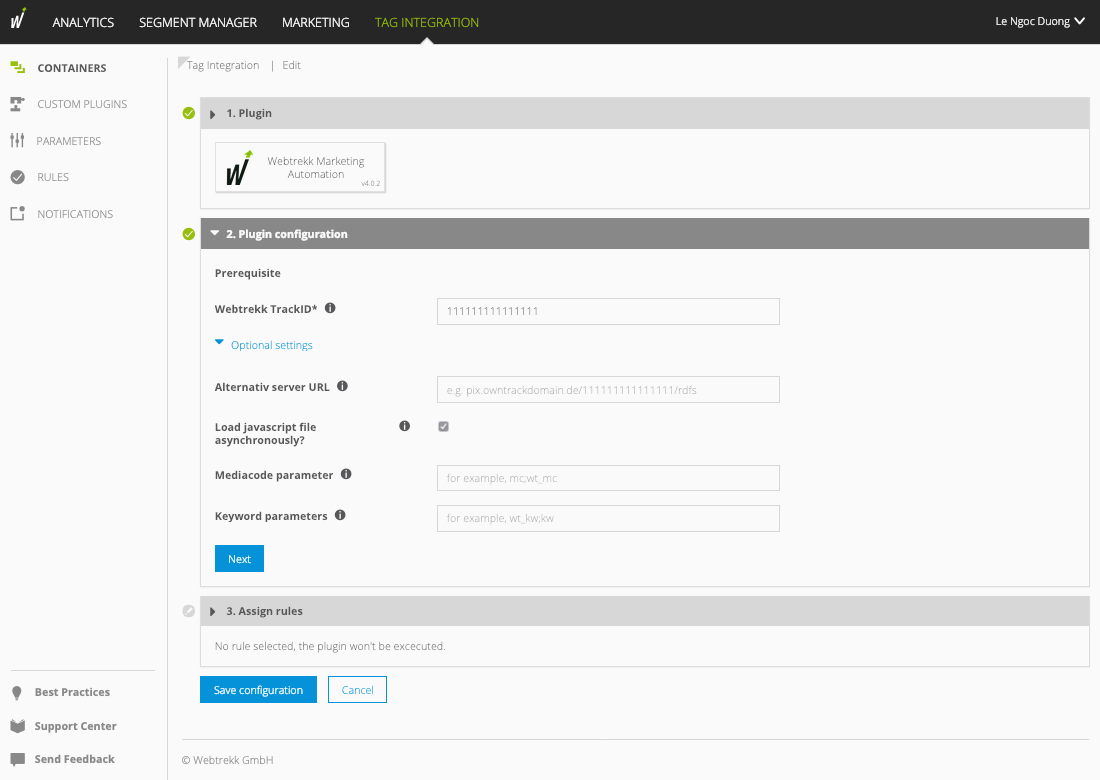
Make the following settings:
Parameter
Description
Mapp Intelligence track ID Mapp Intelligence uses the track ID to assign the server requests to an account.

How to get the TrackID
1. Log in Q3.
2. Go to Configuration > System Configuration > Data Collection.
3. Here, you will find "Your Track ID."
Please use the same tracking IDs that you have stored in the tracking code, regardless of which ID you have used to configure Marketing Automation.
Load JavaScript file asynchronously Activate the checkbox to load the Marketing Automation JavaScript file asynchronously. Media Code parameter Optional. Enter all media code parameters you use for your campaign tracking here. You can also define multiple media codes, separated by semicolons.
Keyword parameter Optional. Enter any keyword parameters you use for your campaign tracking here. You can also define multiple keywords separated by semicolons.
Click [Next] to add rules.
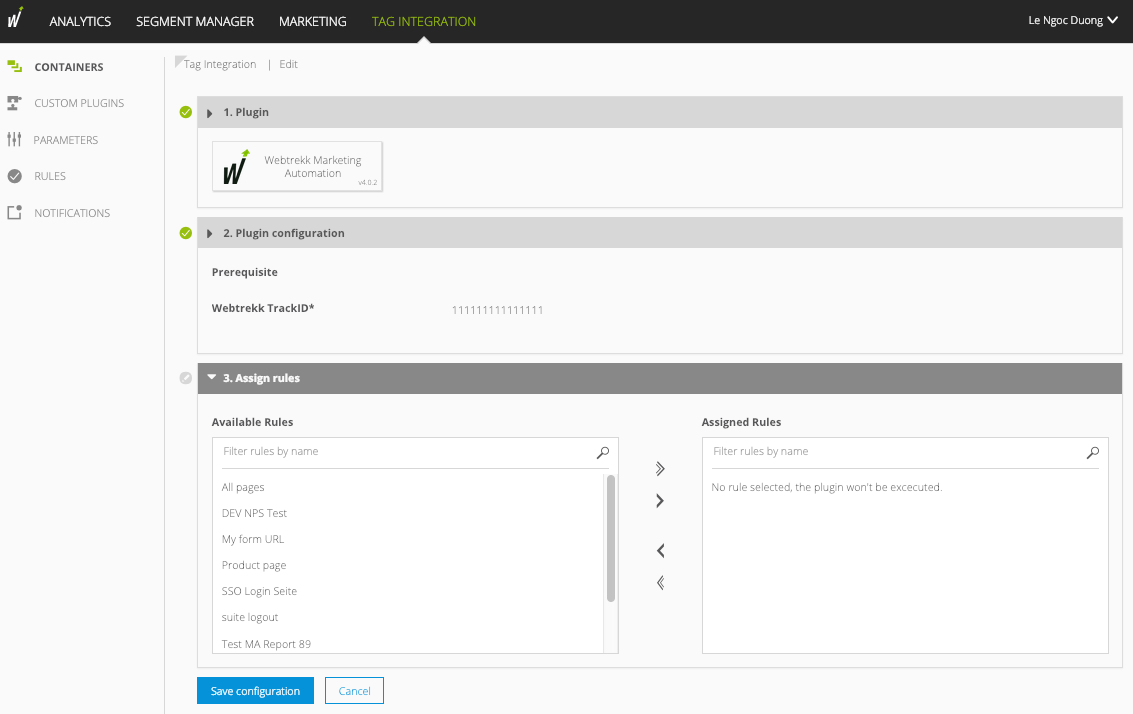
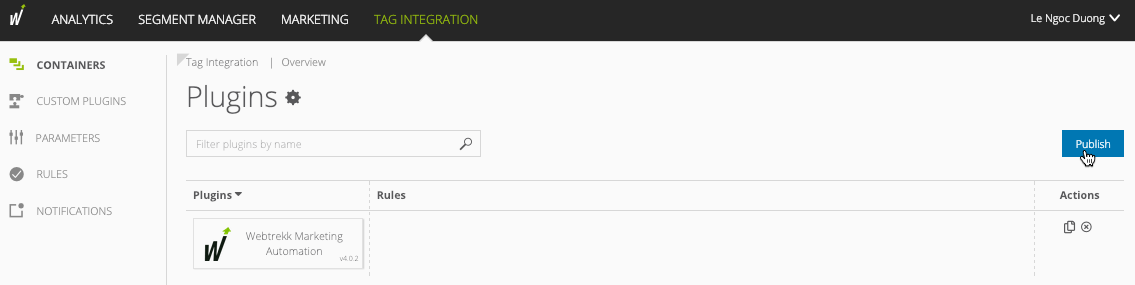
Finally, click [Save configuration]. The plugin is added to the container.
In the last step, click [Publish].
- First, download the JavaScript file "pixel-marketingautomation.min.js".
Integrate the downloaded script directly into the <head> of your webpage. This is necessary to load all campaigns as early as possible.
Example page-specific integration<head> <!-- ...... --> <script type="text/javascript" src="path/to/file/webtrekk_mcp.min.js"></script> <!-- ...... --> </head>XMLThe configuration object "wt_marketingAutomationConfig" is located inside the plugin. Here, you can set the following parameters:
Example
(function(window, document) { var wt_marketingAutomationConfig = window.wt_marketingAutomationConfig || { trackId: "111111111111111", async: true, mediacode: "wt_mc;wtmc;mc", keyword: "wt_kw;wtkw;kw", mcpBaseURL: "", widgetServiceUrl: "" }; // ...... })(window, document);JSParameter
Description
trackId Mapp Intelligence uses the track ID to assign the server requests to an account.
How to get the TrackID
1. Log in Q3.
2. Go to Configuration > System Configuration > Data Collection.
3. Here, you will find "Your Track ID."
Please use the same tracking IDs that you have stored in the Mapp Intelligence tracking code, regardless of which ID you have used to configure Marketing Automation.
async true = The Marketing Automation JavaScript file will be loaded asynchronously. mediacode Optional. Enter all media code parameters you use for your campaign tracking here. You can also define multiple media codes separated by semicolons.
keyword Optional. Enter any keyword parameters you use for your campaign tracking here. You can also define multiple keywords separated by semicolons.
mcpBaseURL Defined the location of the Mapp Marketing Automation functionality JavaScript file. Default value is "//cdn.mateti.net/mcp/onsite.min.js".
Please contact our Support or your responsible Customer Success Manager for activation if you prefer to fetch this library using your first-party Custom Track Domain (C-Name) for better data quality and quantity and to avoid Content Security Policy issues.widgetServiceUrl Defined the location of the Mapp Marketing Automation server configuration. Default value is "//[Trackdomain]/[TrackId]/rdfs".
Please contact our Support or your responsible Customer Success Manager for activation if you prefer to fetch this library using your first-party Custom Track Domain (C-Name) for better data quality and quantity and to avoid Content Security Policy issues.To activate the plugin functionality, the parameter "executePluginFunction" is used in the tracking pixel. This can be set either in the configuration variable (webtrekkConfig) or as a parameter of the pixel object.
Example global configuration
var webtrekkConfig = { trackId: "111111111111111", trackDomain: "track.webtrekk.net", domain: "www.website.com", executePluginFunction: "wt_teaserTracking;wt_marketingAutomation" };JSExample page-specific configuration
var wt = new webtrekkV3(); wt.contentId = "de.startseite"; wt.executePluginFunction = "wt_teaserTracking;wt_marketingAutomation"; wt.sendinfo();JSParameter
Description
executePluginFunction Enter the Marketing Automation plugin. A semicolon separates multiple plugins.